How to Install Pavers | Full Paver Installation Process for Patio Projects
A professional installation follows a series of steps to make sure the finished patio or walkway will last for decades without shifting or settling. The entire process begins with a solid plan and a good design. This is where you decide on the shape, size, and layout of your paver project. After the planning stage, the work begins with the preparation of the site. This is often the most labor-intensive part of the job, but it is also the most important for the long-term success of your patio.
Here are the basic steps for how to install pavers from start to finish:
Planning and Design: First, you need a plan for the project, including the exact dimensions and any patterns you want to use. You will also need to mark the area out with spray paint or stakes.
Excavation: You need to dig out the area to the proper depth, which accounts for the thickness of the pavers, the bedding sand, and the gravel base.
Base Preparation: This is the most crucial part. You will lay down and compact a layer of crushed gravel, followed by a layer of bedding sand.
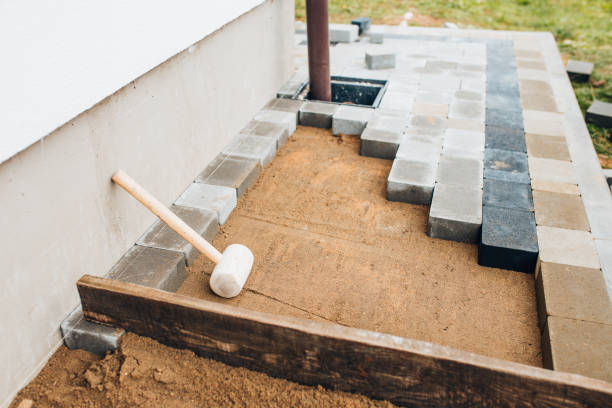
Paver Laying: You will lay the pavers in the desired pattern, gently tapping them into place with a rubber mallet.
Edging: Once the pavers are laid, you will install a paver edging around the perimeter to hold everything in place.
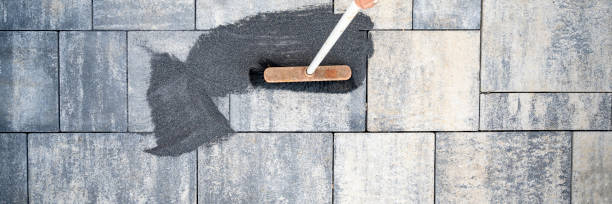
Joint Sand: Polymeric sand is swept into the joints between the pavers and then wetted to harden and lock everything together.
Compaction and Sealing: A final pass with a plate compactor sets the pavers firmly in place, and a sealer can be applied to protect the surface.
This is the standard paver installation process that professionals follow to ensure a quality result. Each of these steps is essential, and skipping any of them can lead to problems down the road. For example, if you don't properly compact the base, your pavers will start to sink and become uneven over time. If you want a beautiful and long-lasting patio but you don't have the time or the tools to do the job yourself, then hiring a professional team is the best choice. At Modern Yardz, we are experts in how to install pavers, and we handle the entire process for you. From the initial design to the final sealing, our team has the knowledge and equipment to ensure your patio is perfect. We can help you install patio pavers that will stand the test of time. Check out our build portfolio to see some of the amazing projects we have completed. If you want a professional team to handle your paver project, we are ready to help.
How Do I Prepare the Base for Paver Installation?
Preparing the base is arguably the most important step in the entire paver installation process. The strength and longevity of your paver project are almost entirely dependent on the quality of the base underneath. A lot of people wonder how to install pavers and think that the base is just a simple layer of sand. The truth is that a professional-grade base has multiple layers, and each layer serves a specific purpose. It is a lot of work, but it is what separates a DIY job from a permanent, professional-looking patio. Without a proper base, your pavers will shift, sink, and become a headache in a very short amount of time.
The first step in preparing the base is excavation. You need to dig out the area to a depth that will accommodate all the layers of your base and the pavers themselves. For most residential projects, this means digging down about 7 to 8 inches. You also need to make sure you have a proper grade for drainage. You want the water to run off your patio and away from your house, so a slight slope of a quarter inch per foot is ideal. Once the area is excavated, the next step is to lay down and compact the subgrade, which is the soil you just dug out. This creates a firm surface to start with. The next layer is the crushed stone or road base. This is the main structural layer, and it should be laid down in layers of two to three inches at a time, with each layer being compacted thoroughly with a plate compactor. This compaction is what gives the base its strength. Without it, the base will settle unevenly over time. This is a very critical part of how to install pavers and cannot be skipped.
After the compacted gravel base is in place, the final layer of the base is the bedding sand. This layer is usually about one inch thick and is used to create a perfectly smooth, level surface for the pavers to sit on. You will use a screed to level the sand, creating a flawless surface. The quality of this base preparation is what gives a paver patio its professional finish and ensures it will last for decades. This is one of the biggest reasons to hire professionals. At Modern Yardz, we specialize in the entire paver installation process, and we have the right equipment and experience to get the base right every time. Our attention to detail here is what makes our projects stand out and last for a very long time. We can also help you with other outdoor projects, such as a beautiful outdoor kitchen or a concrete patio.
Do I Need Sand or Gravel Beneath My Pavers?
If you are asking, "Do I need sand or gravel beneath my pavers?" the short answer is that you need both. Sand and gravel each play a different but equally vital role in a professional paver installation process. Neither one is a substitute for the other, and a proper paver patio needs both layers to be strong and stable. The gravel is the structural support layer. It is the first layer to go down after the ground has been excavated and compacted. The gravel, which is usually a crushed stone or road base material, provides a firm, load-bearing foundation that prevents the pavers from sinking into the soil. It also helps with drainage, allowing water to pass through the patio and into the ground below. This is especially important for areas with a lot of rain, as it helps to prevent water from pooling on your patio.
The sand, on the other hand, is the leveling layer. It is a thin layer, usually about one inch thick, that goes on top of the compacted gravel base. The purpose of the sand is to create a perfectly smooth and flat surface for the pavers to sit on. It is very difficult to make the gravel layer perfectly level, so the sand fills in any small gaps and imperfections, making it easy to create a flawless surface. The sand also provides a cushioning effect for the pavers, helping to prevent them from cracking. When you install patio pavers on this sand layer, you can gently tap them into place to get a perfectly even surface. The combination of the two layers—the strong, load-bearing gravel and the perfectly level sand—is what gives a paver patio its strength and beauty.
Trying to figure out all these details on your own can be a challenge. How to install pavers and get all the layers just right is a process that takes practice and experience. Many people try to skip a step or use the wrong materials, and their paver patio ends up having problems in just a few years. That is why hiring a professional team is the best way to ensure a beautiful and long-lasting result. At Modern Yardz, we follow the best practices for every paver project we do. We use the right materials and compact the base correctly to ensure your patio is built to last. We can also help you with a complete landscape design, so your new paver patio fits perfectly with the rest of your yard. We have a lot of great ideas for a complete yard makeover, from fire features to landscape lighting. If you are ready to install patio pavers and create the outdoor space of your dreams, we are here to help. Contact Modern Yardz for a free consultation today and let our team get to work for you.
How Do I Ensure My Pavers Stay Level Over Time?
Ensuring your pavers stay level over time is the ultimate goal of a professional paver installation process. The stability and durability of your patio or walkway are not a matter of luck; they are the direct result of following a series of critical steps. It all starts with the base. The ground underneath your pavers, known as the subgrade, must be properly compacted before you even lay a single piece of gravel. If the subgrade is not firm, your entire patio will be at risk of shifting and sinking. After the subgrade is prepared, the gravel base is laid down and compacted in layers. This gravel is the main structural support for your patio, and a professional job will make sure it is strong and unyielding. Trying to skip a step or rushing the compaction process is the number one reason why pavers become uneven over time.
Once the base is prepared and compacted, the next crucial step is the paver edging. This is a plastic or concrete border that is installed around the entire perimeter of your patio. The edging is a very important part of how to install pavers because it acts like a frame, holding all the pavers tightly together. Without this edging, the pavers on the outside edges are free to move and shift, which can cause a domino effect of shifting and settling across the entire patio. So, a properly installed edging is essential for keeping everything in its place. The final component for a level and stable patio is the joint sand. Polymeric sand is a special type of sand that is swept into the joints between the pavers. Once it is wet and dries, it hardens to lock the pavers together, creating a solid, interconnected surface. This not only prevents weeds from growing but also provides a lot of lateral stability to the entire paver installation.
A paver patio that is still perfectly level and beautiful years after it was installed is a sign of a job well done. The combination of a properly compacted base, secure edging, and hardened joint sand is the secret to a long-lasting patio. This is the professional way of how to install pavers, and it is what separates a quality job from a cheap one. If you want a paver patio that you will be able to enjoy for decades without any of the shifting and settling, hiring professionals is the best choice. At Modern Yardz, we are experts at every part of the paver installation process. Our team has the equipment and expertise to ensure your base is perfect and that every paver is laid with precision. We are confident we can help you with all of your paver needs, so you can enjoy your outdoor space without any worries. You can see a lot of our completed work by checking out our build portfolio.
What Patterns Can I Use When Laying Pavers?
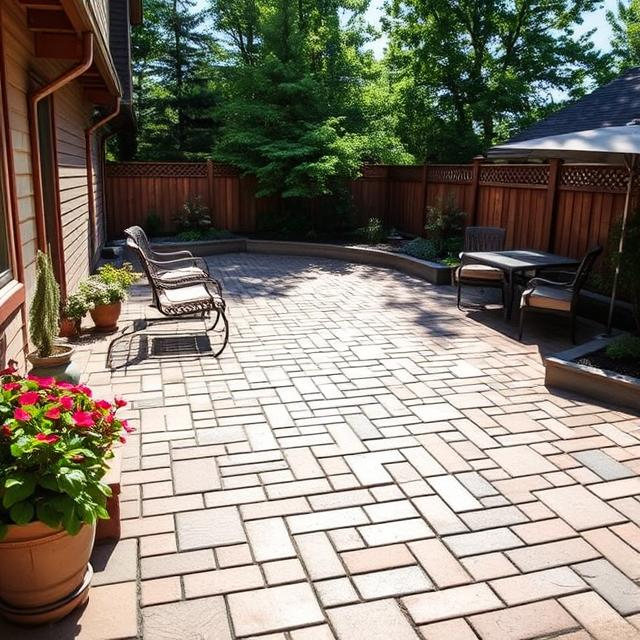
One of the best things about pavers is that you have a ton of design flexibility. You can use different paver patterns to create a unique and attractive look for your patio or walkway. The pattern you choose can dramatically change the feel of your outdoor space, from classic and traditional to modern and dynamic. A good design is a crucial part of the paver installation process, and it is a good idea to spend some time thinking about what you want your finished project to look like. Here are some of the most popular patterns that you can use when you install patio pavers:
Running Bond: This is one of the most common and easiest patterns to install. Pavers are laid side-by-side in a simple brick-like pattern. It is a very clean and classic look that works well for almost any space.
Herringbone: The herringbone pattern is made by laying pavers at a 45 or 90-degree angle to create a zigzag design. This is a very strong, interlocking pattern that is perfect for high-traffic areas like a driveway or a main walkway.
Basket Weave: In this pattern, pairs of pavers are laid side-by-side in a square, with each subsequent square turned 90 degrees. It creates a visually interesting and classic look that is perfect for a more traditional home.
Stacked Bond: This is the most simple pattern, with pavers laid directly on top of each other in a straight grid. It creates a very modern and clean look that works great in contemporary designs.
These are just a few of the many patterns you can use, and you can also mix and match different sizes and colors of pavers to create a truly custom look. Choosing a pattern is a big decision, and it is a good idea to consider the style of your home and the overall landscape of your yard. If you need some help with the design, a professional landscape designer can be a huge help. At Modern Yardz, we specialize in landscape design and can help you choose the perfect paver pattern and layout for your home. We can show you how different patterns will look in your space and help you create a stunning outdoor area. Our team can help you with the entire paver installation process, from the initial design to the final installation. We have a lot of great ideas for your outdoor space and you can see many of them in our design portfolio.
Should I Seal the Pavers After Installation?
After you finish the paver installation process and everything is in place, you might be wondering, "Should I seal the pavers after installation?" The answer is an overwhelming yes. Sealing your pavers is a final, but very important, step in the installation process. It is the best way to protect your investment and keep your patio looking great for many years to come. Think of the sealer as a shield for your pavers. It provides a protective layer that guards against a number of different things that can damage your pavers over time.
One of the biggest benefits of a sealer is that it protects your pavers from stains. Things like oil, grease, food spills, and even rust can be a big problem for pavers, but a good sealer will make them much easier to clean and prevent a stain from setting in. A sealer also protects your pavers from fading due to the sun's UV rays, helping to keep the color vibrant and fresh. It also helps to prevent efflorescence, which is a white chalky haze that can appear on the surface of some pavers. Sealing also makes your patio much easier to clean. Dirt and grime can be hosed off easily, and your patio will look like new with very little effort. There are a few different types of sealers you can choose from. Some sealers provide a natural, invisible look, while others can give your pavers a "wet look" that enhances their color and shine. For a professional-looking patio, sealing is a step you should not skip. When you are looking for how to install pavers, sealing is a crucial part of the process.
This final step is a big part of the professional paver installation process, and at Modern Yardz, we can handle it all for you. Our team can not only help you install patio pavers, but we can also apply the perfect sealer to protect them and make them look their best. A professionally sealed paver patio will stand up to the elements and look great for a very long time. We offer a full range of services for your entire yard, from paver patios to patio covers and pergolas, so we can help you with a complete outdoor living space. We can also help you with a lot of other things, like pools and spas, and all of our projects are designed to be beautiful and durable. If you are ready to get started on your dream yard, we are here to help. Contact Modern Yardz for a free consultation today and let us show you how we can transform your outdoor space.
Frequently Asked Questions. Here are some common questions. Find the answers you're looking for below.
What is the complete step-by-step paver installation process for a durable patio when learning how to install pavers?
Modern Yardz explains that the paver installation process starts with site preparation, including excavation and base compaction, followed by laying a sand bedding, placing the pavers, and finishing with joint filling and compaction. This ensures a strong, long-lasting surface when you install patio pavers.
How do I properly prepare the ground before I install pavers to prevent shifting during the paver installation process?
Modern Yardz recommends removing vegetation, grading the area for drainage, and compacting a gravel base. Proper ground prep is crucial in the paver installation process to create a stable foundation when you install patio pavers.
What tools do I need for the best results when learning how to install pavers and carry out the paver installation process?
Modern Yardz suggests having a tamper, level, rubber mallet, string line, and saw for cutting pavers. Using the right tools simplifies the paver installation process and helps install patio pavers efficiently.
Can I install patio pavers myself, or should I hire a professional for the paver installation process?
Modern Yardz says many DIYers can install patio pavers with careful planning, but complex designs or large areas might require professional help during the paver installation process.
How long does the entire paver installation process typically take when you install patio pavers?
Modern Yardz estimates that a small patio project may take a couple of days, while larger or more intricate projects require several days to complete when you install patio pavers.
How do I ensure proper spacing and alignment during the paver installation process when learning how to install pavers?
Modern Yardz recommends using string lines and spacers to keep consistent gaps and straight lines, which is vital when you install patio pavers for a polished look.
What kind of sand or joint filler should I use after laying pavers during the paver installation process?
Modern Yardz suggests polymeric sand, which hardens to lock pavers in place and resist weeds and insects, making the paver installation process more durable when you install patio pavers.
How do I protect newly installed patio pavers from weather damage after the paver installation process?
Modern Yardz advises sealing the surface to repel stains and moisture after completing the paver installation process, helping your installed patio pavers last longer.
What maintenance is needed after completing the paver installation process to keep installed patio pavers in good condition?
Modern Yardz recommends regular sweeping, resealing every few years, and inspecting joints for sand loss to maintain the quality of installed patio pavers.
Can I customize patterns when I install patio pavers, and how does that affect the paver installation process?
Yes, Modern Yardz notes that while simple patterns are easier to install, complex designs require careful layout planning but add unique appeal when you install patio pavers.
What is the best way to handle slopes or uneven ground during the paver installation process?
Proper excavation and graded base layers help manage slopes and ensure a stable paver surface.
Can I install patio pavers over an existing concrete slab?
Yes, but you’ll need to clean the slab, add a bedding layer, and ensure proper drainage before installation.
How do I prevent weeds from growing between installed patio pavers?
Using polymeric sand and sealing joints are effective strategies to minimize weed growth.
What are the typical costs involved in the paver installation process?
Costs vary by materials, labor, and project size; DIY projects reduce labor costs significantly.
Can I install patio pavers in colder climates, and are there special considerations?
Yes, but you should use frost-resistant materials and ensure proper base drainage to handle freeze-thaw cycles.


.webp)
.webp)