Building an outdoor kitchen is more than just adding a grill to your patio; it's about crafting an entirely new lifestyle. It's about creating a dedicated space where memories are made, where laughter echoes, and where the aroma of delicious food fills the air. Especially in 2026, with the growing desire for enhanced home comfort and sophisticated entertaining, understanding exactly how to build a stone outdoor kitchen has become a pivotal project for many homeowners. We're not just seeing a trend; it's a significant, sometimes dramatic shift towards comprehensive outdoor living. Our team at Modern Yardz has been at the forefront of this movement, helping clients realize their visions for years.
There's something uniquely appealing about stone in an outdoor setting. Its timeless beauty, incredible durability, and natural resistance to the elements make it an ideal choice for a structure designed to withstand the test of time and weather. That's why we believe learning how to build a stone outdoor kitchen isn't just a home improvement project; it's an investment in your home's aesthetic, functionality, and overall value. We've certainly seen firsthand the transformative power of a well-designed outdoor cooking and entertaining area. It truly elevates the entire property, doesn't it?
Why a Stone Outdoor Kitchen is Your 2026 Must-Have
In our experience, clients are increasingly looking for lasting value and unparalleled aesthetics from their outdoor investments. A stone outdoor kitchen delivers on both fronts, and then some. Unlike more temporary or composite materials, natural stone offers an organic beauty that integrates seamlessly into any landscape, from the most modern minimalist garden to a sprawling, rustic estate. It's a choice that speaks volumes about quality and permanence. Think about it: a structure built from stone often outlives the home it serves, requiring minimal upkeep while consistently looking magnificent. This longevity is a critical, non-negotiable element for many of our discerning clients in 2026, who are tired of fleeting trends.
Beyond its visual appeal, stone provides exceptional practical benefits. It's incredibly resilient, shrugging off harsh weather, intense UV exposure, and the inevitable spills and splashes that come with outdoor cooking. You won't find it warping, fading, or deteriorating like some other materials can. This robust nature means less maintenance for you, freeing up your time to actually enjoy your outdoor oasis rather than constantly tending to it. We've found that this low-maintenance aspect is a huge selling point, especially for those with demanding schedules and high expectations for their living spaces. When you understand how to build a stone outdoor kitchen correctly, you're building a legacy.
Essential Planning Before You Start
Before you even think about laying the first stone, meticulous planning is paramount. We can't stress this enough. This initial phase, often overlooked or rushed, is where the success or failure of your project truly hinges. Our team, with years of expertise in Landscape Design SAN Diego, knows that a detailed plan prevents costly mistakes and ensures the final outcome perfectly aligns with your vision. It's comprehensive, requiring thought on several crucial elements. Honestly, though, this is where the fun begins, imagining the possibilities.
First, consider the layout and location. Where will your outdoor kitchen best serve your needs? Is it close to your indoor kitchen for easy access, or perhaps near your pool for seamless entertaining? Think about sun exposure, prevailing winds, and proximity to utilities (water, gas, electricity). You'll need to decide on the overall footprint, too. Are you envisioning a simple grill station or a full-blown culinary complex with extensive counter space and multiple appliances? We always recommend sketching out a few different layouts, maybe even creating a rough mock-up with stakes and string to get a real feel for the space. This is a vital step when figuring out how to build a stone outdoor kitchen.
Next, the design aesthetic. Stone is versatile, but the specific type of stone you choose will heavily influence the overall look. Are you leaning towards a rustic, earthy feel with irregular flagstone, or a sleek, modern vibe with cut limestone or granite? Integrating your outdoor kitchen with existing hardscaping, like Pavers SAN Diego or your overall Landscape Lighting SAN Diego scheme, is essential for a cohesive look. Our team specializes in custom outdoor spaces, so we understand the nuances of blending new structures with existing elements.
And another consideration: local regulations and permits. This is crucial. Depending on the size, complexity, and exact location of your stone outdoor kitchen, you'll almost certainly need permits. Zoning laws, building codes, and utility hook-up requirements vary, so checking with your local authorities before construction begins is non-negotiable. Skipping this step can lead to significant headaches, delays, and even fines down the line. We mean this sincerely: it runs on genuine connections and proper adherence to regulations. Our experience shows that being proactive here saves immense trouble.
Choosing Your Stone: Materials Matter
The heart of understanding how to build a stone outdoor kitchen lies in selecting the right materials. The type of stone you choose impacts not only the aesthetic but also the durability, cost, and complexity of installation. We've worked with a myriad of natural stones, each with its unique characteristics and charm. Let's delve into some popular options:
- Granite: A perennial favorite, granite is incredibly dense, non-porous (when sealed), and resistant to heat, scratches, and stains. It's an excellent choice for countertops and can also be used as a veneer. Its wide range of colors and patterns makes it incredibly versatile. It's a premium option, certainly, but its longevity and beauty often justify the investment.
- Limestone: Offering a softer, more earthy aesthetic, limestone can create a warm and inviting atmosphere. It's generally more porous than granite, so proper sealing is vital to protect it from moisture and staining. It requires a bit more care, but its natural elegance is undeniable.
- Travertine: Another beautiful natural stone, travertine presents unique swirling patterns and warm tones. Like limestone, it's porous and needs sealing. It's often used for flooring or as an accent, but with proper treatment, it can certainly contribute to the structural elements of your outdoor kitchen.
- Fieldstone/River Rock: For a truly rustic and organic look, fieldstone or river rock delivers. These irregular, naturally rounded stones are often used for a more informal, natural appearance, giving your outdoor kitchen a timeless, almost ancient feel. Working with these can be more labor-intensive due to their varied shapes.
- Manufactured Stone Veneer: While not natural stone, manufactured stone veneer is a popular alternative that mimics the look of real stone at a lower cost and weight. It's typically made from concrete and molded to replicate various stone textures. If you're looking for the stone aesthetic without the full weight or cost of natural stone, this is a viable option, though we always recommend weighing its long-term durability against natural stone. It's an important consideration when assessing how to build a stone outdoor kitchen on a budget.
When making your selection, consider not just the look, but also the climate, maintenance requirements, and your budget. Our team can guide you through the pros and cons of each, ensuring you make an informed decision for your specific project. This approach (which we've refined over years) delivers real results.
The Foundation: Building a Solid Base
Regardless of the stone you choose, a robust, level foundation is absolutely critical. This isn't just a suggestion; it's the bedrock upon which your entire outdoor kitchen will stand – literally. Without a proper foundation, your stone structure could settle unevenly, crack, or become unstable over time, leading to significant structural issues. We've seen it happen, and it's always a shame. That's why understanding this step is key to knowing how to build a stone outdoor kitchen that lasts.
For most stone outdoor kitchens, we recommend a reinforced Concrete SAN Diego slab. The slab should be poured on a compacted gravel base, typically 4-6 inches thick, and include steel rebar or wire mesh for added strength. The depth of the slab and the extent of reinforcement will depend on the size and weight of your planned structure, as well as local frost line requirements. It's vital that the slab extends beyond the footprint of your kitchen by at least a few inches on all sides to provide ample working room and prevent future erosion around the base.
Proper drainage is another often-underestimated aspect of foundation work. You don't want water pooling around or under your outdoor kitchen. Grading the surrounding area away from the foundation, or even incorporating a perimeter drain, can prevent moisture buildup, which is detrimental to any outdoor structure, particularly one made of stone. We certainly recognize that a properly prepared site is the unsung hero of any successful outdoor build. Without it, you're building on shaky ground, literally.
Constructing the Framework and Cabinetry
Once your foundation is solid and cured, it's time to build the structural framework. This is the skeleton of your outdoor kitchen, and it will support the stone veneer, countertops, and all your appliances. There are a few common approaches here, each with its advantages. Your choice will influence how you effectively complete the task of how to build a stone outdoor kitchen.
- Steel Stud Framing: This is our preferred method for its incredible durability, resistance to rot and insects, and non-combustible properties. Steel studs offer a straight, stable frame that won't warp or twist over time, providing an excellent substrate for cement board and then your stone. It's a bit more specialized to work with than wood, requiring specific tools, but the long-term benefits are substantial.
- Cinder Block (CMU) Construction: For a supremely robust and fire-resistant structure, cinder blocks are an excellent choice. This method provides a solid, monolithic base, perfect for heavy stone veneers and countertops. It's labor-intensive and requires significant masonry skills, but the resulting structure is virtually indestructible. Our team has extensive experience with Seat Retaining Walls using CMU, so we're well-versed in this type of construction.
- Pressure-Treated Wood Framing: While less common for the main structural elements of a stone outdoor kitchen due to concerns about rot, insects, and combustibility, pressure-treated wood can be used for internal cabinetry or non-load-bearing elements, if properly protected and vented. We generally advise against it for the primary framework of a stone structure due to the inherent moisture exposure outdoors.
After the framework is complete, you'll typically sheath it with cement board. This provides a stable, moisture-resistant surface for your stone veneer. Securely attach the cement board using appropriate screws, ensuring all seams are taped and mudded to create a continuous, robust surface. This step is indispensable for a lasting finish when you're learning how to build a stone outdoor kitchen.
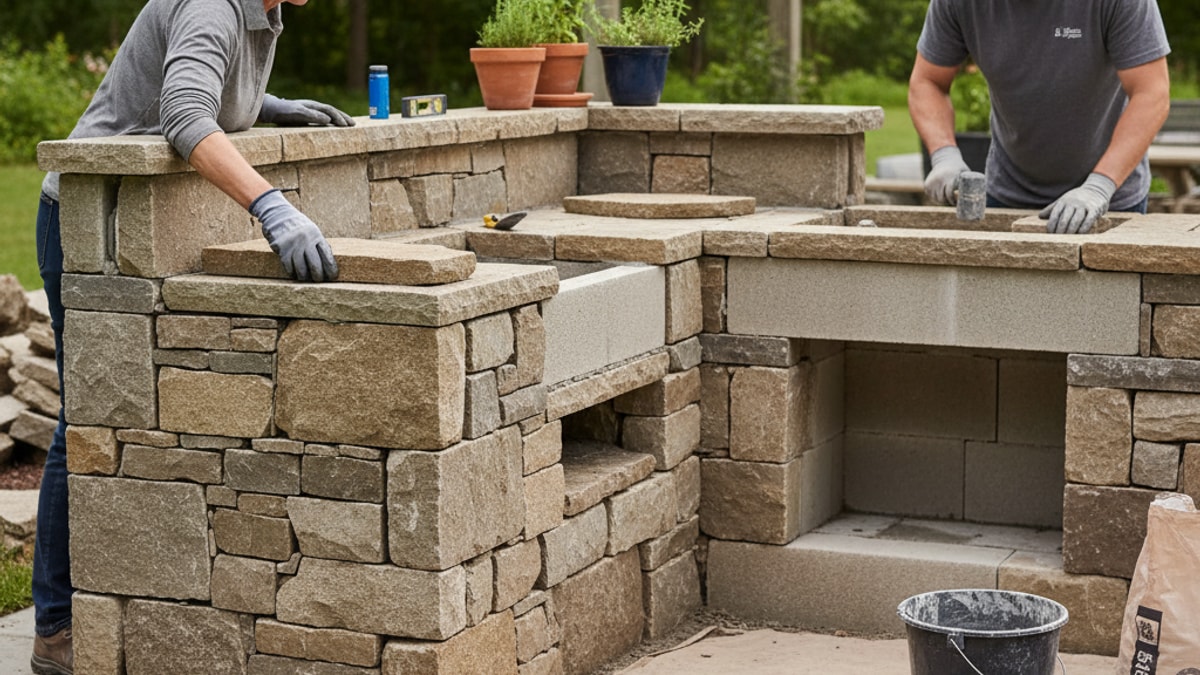
Mastering the Stone Veneer Application
Applying the stone veneer is arguably the most visually impactful step in learning how to build a stone outdoor kitchen. This is where your vision truly comes to life, as the raw framework transforms into a beautiful, solid stone structure. It's a craft that requires patience, a keen eye, and the right techniques.
First, you'll need a good quality mortar specifically designed for stone veneer. Mix it to a consistent, workable consistency – not too wet, not too dry. We always recommend doing a small test batch first. Before applying the mortar, lightly dampen the back of each stone and the surface of the cement board; this helps with adhesion. It's a small trick, but it makes a significant difference.
When applying the stone, start from the bottom and work your way up. This prevents stones from slipping and ensures a consistent bond. Apply a generous layer of mortar to the back of each stone (or to the cement board, depending on your preferred method) and firmly press it into place, wiggling it slightly to ensure good contact. Pay close attention to your joint lines, aiming for consistency if using cut stone, or a natural, varied look if working with irregular pieces. We often spend a lot of time on this detailing, as it truly defines the finished product.
Once the stones are set, you'll need to


.webp)
.webp)