Every outdoor space, no matter its size or existing topography, holds immense potential. We believe that. But unlocking that potential, especially on sloped properties, often requires a formidable architectural feature: the retaining wall. It's more than just a barrier; it's a structural necessity, a design element, and, when done right, a long-term investment in your property's stability and aesthetic appeal. However, a retaining wall without proper drainage is, quite frankly, a ticking time bomb. It's not a question of if it will fail, but when. And the consequences, our team has found, can be significant, sometimes dramatic.
That's precisely why understanding how to build a retaining wall with drainage isn't just a recommendation; it's a critical, non-negotiable element of any successful landscaping project. Here at Modern Yardz, we've seen firsthand the catastrophic outcomes when this crucial step is overlooked. From minor bowing to outright collapse, the issues stemming from inadequate water management are relentless. In 2026, with evolving construction standards and a greater understanding of hydrological pressures, we're seeing an even stronger emphasis on integrated drainage solutions. Let's delve into the essential principles and practical steps involved in creating a retaining wall that isn't just beautiful, but also incredibly resilient.
The Unflinching Reality: Why Drainage is Non-Negotiable
Imagine a wall, stoic and strong, holding back tons of saturated soil after a heavy downpour. Without a way for that water to escape, hydrostatic pressure builds. It's an immense, often underestimated force, pushing against the wall's structure, relentlessly seeking an escape route. This isn't just a 'maybe' scenario; it's an inevitability. Over time, this constant pressure will compromise the wall's integrity. You'll start to see cracks, bulging, and eventually, failure. Honestly, though, it’s not just about structural failure; it's about safeguarding your entire landscape, protecting adjacent structures, and preserving the investment you've made in your outdoor living areas. Building a wall without thinking about how to build a retaining wall with drainage is like building a boat without a hull – it just won't work.
What happens when water saturates the soil behind your wall? The soil's weight increases dramatically, and its internal friction, which gives it strength, decreases. This combination is a recipe for disaster. We've seen properties develop soggy, unstable areas, even jeopardizing the foundations of nearby patios or Outdoor Kitchens. The truth is, proper drainage safeguards against these issues, ensuring the wall performs its intended function for decades. It's a foundational principle we uphold in all our projects, including Seat Retaining Walls, where aesthetics meet robust engineering.
Planning Your Project: The Blueprint for Success
Before you even think about moving a single block, comprehensive planning is paramount. This isn't a weekend DIY project to tackle on a whim. Our experience shows that meticulous preparation saves time, money, and considerable frustration down the line. First, assess your site's topography. What's the slope? Where does water naturally flow? Are there existing structures or utility lines that need to be considered? These initial observations will heavily influence your design decisions.
Next, consider the wall's height and length. Taller walls, especially those exceeding four feet, often require professional engineering and permits. It's critical to check local building codes and regulations in your area as early as possible in 2026. Ignoring this step can lead to costly rework or, worse, safety hazards. We always recommend consulting with experienced professionals for complex projects. Our team, for instance, offers specialized expertise in Landscape Design that integrates structural elements seamlessly.
Material selection is another crucial aspect. Retaining walls can be built from various materials: concrete blocks (segmental retaining wall or SRW systems), natural stone, timber, or poured concrete. Each has its pros and cons in terms of aesthetics, cost, durability, and ease of installation. For most homeowners looking at how to build a retaining wall with drainage, SRW systems are often the most accessible and effective option due to their interlocking design and engineered strength. We often work with clients to select materials that complement their overall outdoor vision, whether it involves integrating Pavers for a cohesive patio or modern Concrete elements.
Essential Tools and Materials You'll Need
Having the right tools and materials is, well, essential. It's a demanding task, and attempting it with subpar equipment only compounds the difficulty. Here's a rundown of what you'll typically require when you're thinking about how to build a retaining wall with drainage:
- Shovels and Spades: For excavation and backfilling.
- Measuring Tape and String Line: For accurate layout and leveling.
- Level (Torpedo and 4-foot): Crucial for ensuring each course is perfectly level.
- Rubber Mallet: To tap blocks into place without damaging them.
- Plate Compactor: Absolutely vital for compacting the base material and backfill. Don't skip this. Rent one if you don't own it.
- Wheelbarrow: For moving aggregates and soil.
- Safety Gear: Gloves, safety glasses, sturdy boots.
- Retaining Wall Blocks: The main structural component.
- Gravel (Clean, Crushed Stone, 3/4-inch): For the base and the drainage layer. This is a critical component when you're considering how to build a retaining wall with drainage.
- Perforated Drain Pipe (Flexible or Rigid): The heart of your drainage system.
- Landscape Fabric (Geotextile Fabric): To separate soil from gravel and prevent clogging.
- Screeding Material (Sand or Fine Gravel): For leveling the base course.
- Capstones and Adhesive (Construction Grade): For the finishing layer.
Our team always emphasizes that investing in quality materials and having the right tools makes an enormous difference in both the process and the final outcome. It truly does. It's one of those areas where cutting corners simply isn't worth the risk.
Laying the Foundation: The Critical First Steps
This is where the rubber meets the road. A strong foundation is the bedrock of any durable retaining wall. It’s what prevents settling and shifting, which are common culprits in wall failure.
Layout and Excavation: Mark out the wall's path precisely using stakes and string lines. Dig a trench that's wide enough to accommodate your wall blocks plus sufficient space for the drainage system (usually about 6-12 inches wider than the block depth) and deep enough to bury at least one full course of block, plus 6-8 inches for the base material. The depth will vary depending on your wall's height and local frost line. Remember, a common mistake is not digging deep enough, which completely undermines your efforts to build a retaining wall with drainage.
Base Material (Gravel): Fill the trench with 6-8 inches of clean, crushed gravel. This layer is crucial for drainage and stability. Spread it evenly and then, here's the kicker, compact it thoroughly with your plate compactor. Our team can't stress this enough: compaction is absolutely vital. If this layer isn't dense and level, your wall will settle unevenly.
Leveling Pad (Screeding Material): Add a thin layer (about 1 inch) of screeding material over the compacted gravel. This allows you to create a perfectly level surface for your first course of blocks. Use a long, straight board and a level to screed the material, ensuring it's impeccably flat and level across the entire length and width of the trench. This meticulous leveling will save you headaches later on. It's the moment of truth for ensuring you truly know how to build a retaining wall with drainage properly, right from the start.
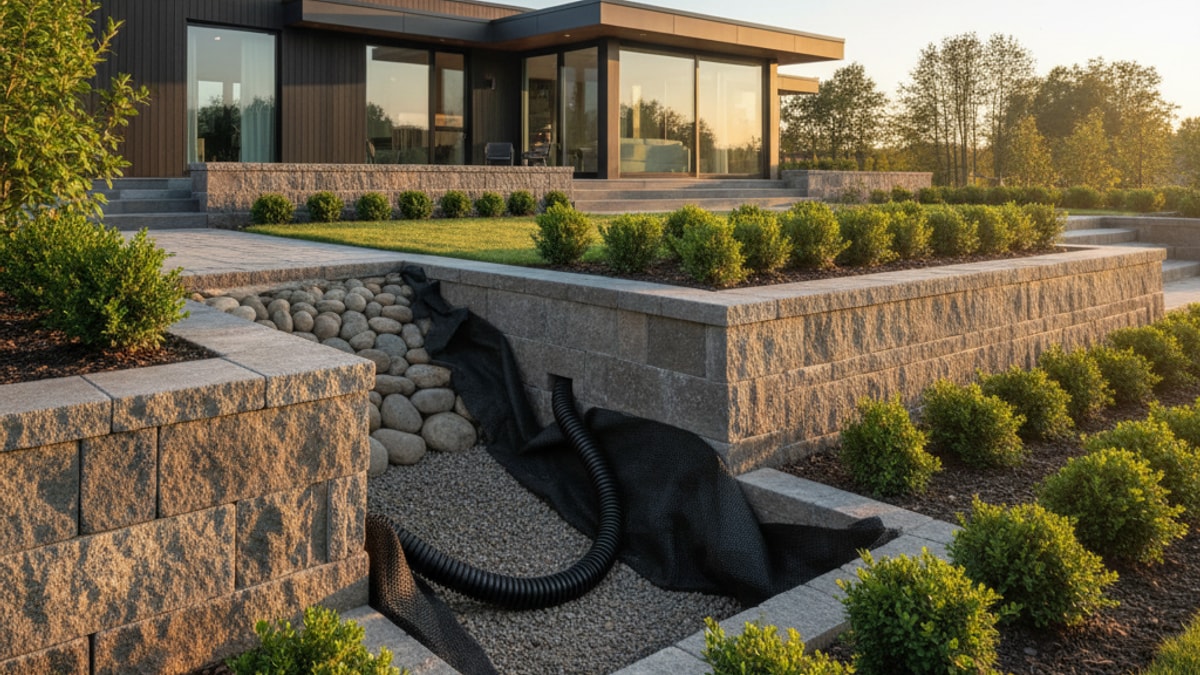
The Heart of the Matter: Implementing Your Drainage System
Now, this is where the how to build a retaining wall with drainage really comes into sharp focus. This system is the unsung hero, silently protecting your investment. We’re talking about two primary components: the drain pipe and the gravel backfill, all protected by landscape fabric.
First Course of Blocks: Lay your first course of retaining wall blocks directly on the perfectly leveled screeding material. Ensure each block is level front-to-back and side-to-side. Use your rubber mallet to gently tap them into place. Don't rush this; the first course dictates the alignment of your entire wall. Our team has found that spending extra time here makes the rest of the build significantly smoother. This initial layer is integral to ensuring the stability that allows your drainage to function effectively.
The Drain Pipe: Once the first course is laid, place your perforated drain pipe (often called a 'French drain' or 'weeping tile') behind the blocks, directly on the compacted gravel base. The perforations should face downwards to collect water most effectively. Ensure the pipe has a slight slope (about 1/8 inch per foot) towards an appropriate discharge point. This could be daylighting at the end of the wall, connecting to a storm drain, or a dry well. This slope is critical for water to move away freely. Without this proper gradient, even the best pipe won't do its job effectively, completely undermining your effort to build a retaining wall with drainage.
Gravel Backfill and Landscape Fabric: This is another critical step in how to build a retaining wall with drainage. Surround the drain pipe with a generous layer of clean, crushed gravel. This gravel acts as an aggregate layer, allowing water to percolate down to the pipe. Crucially, before you add the gravel, line the excavation behind the wall with landscape fabric (geotextile fabric). Extend the fabric up the back of the trench, with enough excess to fold over the top of the gravel layer once it's filled. This fabric prevents soil particles from migrating into your gravel and drain pipe, which would eventually clog the system. We can't stress this enough: clogs mean failure. Fill behind the wall with at least 12-18 inches of gravel, extending up to the level of the next course of blocks.
Building Up: Laying Blocks and Ensuring Stability
With the drainage system in place, you can now focus on building the wall upwards, layer by layer. Remember, consistency and attention to detail are paramount.
Subsequent Courses: Stack the remaining blocks. Many SRW systems have a lip or pin system that naturally sets back each course, creating the necessary batter (slope) for stability. If your blocks don't have this, you'll need to manually set each course back slightly. Always ensure each block is level and plumb. Use your rubber mallet for precise adjustments.
Backfilling and Compaction (Layer by Layer): As you lay each course of blocks, backfill behind the wall with more gravel and then, finally, with compacted soil. The rule of thumb here is to backfill in lifts (layers) of 6-8 inches. After each lift of gravel, and then after each lift of soil, compact it thoroughly with your plate compactor. This progressive compaction is absolutely vital to prevent future settlement and ensure the wall remains stable. This continuous process is integral to understanding how to build a retaining wall with drainage, as it ensures proper load distribution and prevents voids that could lead to water accumulation.
Geogrid (For Taller Walls): For walls taller than 3-4 feet, or those supporting significant loads, geogrid reinforcement is typically required. Geogrid is a polymer mesh that's laid horizontally between courses of blocks and extended back into the compacted soil. It ties the wall into the soil mass, dramatically increasing its stability. This is often where professional engineering becomes non-negotiable. Our team can assess if geogrid is necessary for your specific project when planning your Seat Retaining Walls.
Finishing Touches and Long-Term Care
Once the main structure is complete, it's time for the aesthetic elements that bring the wall to life and ensure its longevity.
Capstones: Secure capstones to the top course of blocks using a high-quality construction adhesive. These not only provide a finished look but also protect the wall from erosion and water infiltration from above. Ensure they're perfectly level and uniformly spaced.
Topsoil and Landscaping: Once the wall is capped and the final backfill is compacted, you can add a layer of topsoil over the remaining gravel and compacted soil. This is where you can truly integrate the retaining wall into your overall Landscape Design. Plant appropriate vegetation that won't compromise the wall's structure (avoid large trees with aggressive root systems close to the wall). Consider incorporating elements like Fire Features or Landscape Lighting to enhance the area around your new wall.
Maintenance: Even with the most robust build, some maintenance is always a good idea. Regularly check your wall for any signs of erosion, shifting, or damage. Ensure the drainage discharge point remains clear of debris. In our experience, proactive maintenance is key to extending the life of any outdoor structure. This includes ensuring your efforts to build a retaining wall with drainage continue to function optimally.
Why Professional Expertise Matters: Our Approach
While this guide provides a comprehensive overview of how to build a retaining wall with drainage, it's important to recognize that these projects can be incredibly complex. There are nuances, site-specific challenges, and unforeseen hurdles that often require the keen eye and skilled hand of experienced professionals. That's where a full-service landscaping design and build company like Modern Yardz truly shines.
We don't just build walls; we craft entire outdoor spaces where memories are made. Our collective expertise means we understand the intricate interplay between design, engineering, and environmental factors. We take into account everything from soil composition and water runoff patterns to the architectural style of your home and your personal aesthetic preferences. We've been doing this for years, refining our processes, and ensuring every project, from a simple Artificial Turf installation to a sprawling transformation featuring Pools AND Spas, is handled with care and precision.
Let’s be honest, tackling a project like this yourself can be a grueling road warrior hustle. It demands demanding schedules and high expectations for precision. That's why we're here. We provide comprehensive solutions, ensuring every aspect, especially the critical drainage system, is executed to the highest standards. Our team handles every step of the process, from initial conceptualization to the final construction, transforming your outdoor space into something extraordinary. This approach (which we've refined over years) delivers real results, giving you peace of mind knowing your retaining wall will stand strong, beautiful, and effectively drained for generations. Ready to Upgrade Your Backyard? Let’s Design the Outdoor Space You’ve Been Dreaming Of.
Retaining Wall Drainage Options Comparison
Different drainage systems offer varied benefits depending on the wall's scale, soil conditions, and budget. Here's a brief comparison of common methods we consider when planning how to build a retaining wall with drainage:
| Drainage System Type |
Description |
Key Advantages |
Considerations |
| French Drain (Perforated Pipe) |
A trench filled with gravel, containing a perforated pipe that collects and redirects subsurface water. |
Highly effective for collecting large volumes of water; relatively straightforward installation. |
Requires a clear discharge point; needs proper slope for gravity flow; susceptible to clogging without geotextile fabric. |
| Gravel Backfill Only |
Using a thick layer of clean, crushed gravel behind the wall without a pipe. |
Simple and cost-effective for smaller, lower walls; good for localized drainage. |
Less effective for high water tables or heavy rainfall; can become saturated; not ideal for taller walls. |
| Weep Holes |
Small openings or gaps left between blocks in lower courses of the wall. |
Allows surface water to drain directly through the wall face; simple to integrate. |
Can lead to erosion on the wall face; limited capacity for large volumes; aesthetic concerns for some materials. |
| Chimney Drain |
A vertical layer of drainage material (gravel, sand, or specialized drainage board) behind the wall, connecting to a horizontal drain pipe at the base. |
Very efficient at intercepting water along the entire height of the wall; often used with geogrid. |
More complex installation; typically requires professional design for larger walls; higher material cost. |
| Integrated Drainage Board |
Geocomposite drainage sheets placed directly against the back of the wall. |
Lightweight and easy to install; provides continuous drainage path; filters out soil fines. |
Higher material cost; requires careful sealing and connection to a base drain pipe; not always suitable for all soil types. |
We always assess the specific site conditions to recommend the most appropriate and effective drainage solution. It's not a 'one size fits all' scenario when it comes to truly understanding how to build a retaining wall with drainage that endures.
Frequently Asked Questions About Retaining Walls with Drainage


.webp)
.webp)