Why a Boulder Retaining Wall? It’s More Than Just a Pile of Rocks
There’s something primal and permanent about a boulder retaining wall. It doesn’t just hold back soil; it anchors a landscape, adding texture, dimension, and a sense of timelessness that you just don't get with manufactured blocks. But let's be honest, the rugged, natural look can be deceiving. It suggests you can just roll a few big rocks into place and call it a day. Our team at Modern Yardz has seen the aftermath of that thinking. A properly constructed wall is a feat of engineering, and understanding how to build a retaining wall with boulders is about mastering gravity, water, and physics.
We've spent years perfecting the craft, transforming tricky slopes into beautiful, functional terraces and creating striking focal points in countless backyards. This isn't just a weekend DIY project you rush into. It’s a significant undertaking that, when done right, will last for generations. Done wrong? It can be a catastrophic, costly failure. So, we're pulling back the curtain and sharing the insights we've gained. This is our comprehensive 2026 breakdown of how to build a retaining wall with boulders, focusing on the non-negotiable principles that ensure your wall is both beautiful and structurally impeccable.
First Things First: The Critical Planning Stage
You can’t just start digging. We can't stress this enough: the success of your project is determined long before the first boulder is moved. This initial phase of how to build a retaining wall with boulders is where you prevent future headaches. Rushing this step is the single biggest mistake we see homeowners make. A few hours of careful planning can save you weeks of remedial work later. Seriously.
First, define the purpose. Are you trying to tame a problematic slope, create a new garden bed, or build a raised patio? The wall’s function will dictate its height, strength requirements, and overall design. A small, decorative garden wall has very different needs than a four-foot wall holding back a significant hillside. Speaking of height, here's a critical professional tip: many municipalities have regulations about retaining wall height. Walls over three or four feet often require a permit and an engineer's stamp. The process of how to build a retaining wall with boulders must always start with a call to your local building authority. Don't skip this. The consequences can be severe, from fines to a tear-down order.
Next, assess your site with an unflinching eye. What's the soil like? Sandy soil drains well but offers less stability, while heavy clay soil holds water and exerts immense pressure (we call this hydrostatic pressure) on the wall. This is a formidable force that can topple an improperly built structure. You also need a clear understanding of water drainage on the property. Where does water flow during a heavy rain? You have to plan for it, or it will dismantle your wall from behind. This is precisely where a professional Landscape Design SAN Diego plan becomes invaluable. Our team doesn't just design for aesthetics; we design for physics and longevity, ensuring every element works in harmony. Mastering how to build a retaining wall with boulders means respecting the power of water.
Finally, map it out. Use stakes and string to outline the wall's location. This gives you a visual reference and helps you calculate the amount of materials you’ll need. How long will it be? How high? Does it curve or run straight? Answering these questions now is fundamental to the entire process of how to build a retaining wall with boulders.
Gearing Up: The Right Tools and Boulders for the Job
Having the right equipment is non-negotiable. This isn't a task for a garden trowel and a pair of sneakers. Safety and efficiency depend on being properly equipped. When our crews tackle a project, they come prepared. Understanding how to build a retaining wall with boulders means respecting the weight and awkwardness of your materials. You’re going to need heavy-duty gloves, steel-toed boots, and safety glasses. Period.
The essential tool list includes a sturdy round-point shovel for digging, a flat spade for cleaning the trench, a hand tamper or plate compactor for the base, a 4-foot level, and a string line with stakes. The real game-changer, though, is a long, heavy-duty steel pry bar (sometimes called a digging bar). This will be your best friend for nudging, levering, and positioning thousand-pound boulders. A strong wheelbarrow is also a must for moving gravel and smaller rocks. This part of how to build a retaining wall with boulders requires some muscle.
Now, let's talk about the stars of the show: the boulders. Not all rocks are created equal. You want hard, dense, and preferably angular stones. Round, river-slick rocks are beautiful but are a nightmare to stack securely. They just want to roll. Angular or sub-angular boulders, on the other hand, lock together. Your choice of stone will define the wall's character, so it's a big decision in the journey of how to build a retaining wall with boulders.
Boulder Type Comparison
| Boulder Type |
Characteristics |
Best For |
| Granite |
Extremely dense, heavy, and durable. Often angular with a classic, speckled look. |
Taller, heavy-duty walls that require maximum strength. |
| Fieldstone |
Harvested from fields, naturally weathered, with varied shapes and colors. |
Rustic, naturalistic walls that blend into the landscape. |
| Sandstone |
Often comes in flat, stackable shapes. Softer than granite, can delaminate over decades. |
Layered, more formal-looking walls, especially for seating. |
| Limestone |
Typically gray or tan, often angular. Can be susceptible to acidic rain over time. |
Both formal and rustic designs, but check its local durability. |
When you're sourcing your boulders, get a good mix of sizes. You'll need massive ones for the base, medium-sized ones for the bulk of the wall, and smaller ones to fill gaps and act as shims. A good rule of thumb we use is to have boulders that are at least as deep as they are high to ensure stability. The complex puzzle of how to build a retaining wall with boulders requires having all the right pieces from the start.
The Foundation: Where Walls Are Made or Broken
We've seen it countless times: a beautiful wall, perfectly stacked, that starts to lean and fail after one or two seasons. The culprit is almost always a weak foundation. The base is the most critical element in learning how to build a retaining wall with boulders. It’s the unseen workhorse that everything else depends on. You simply cannot cut corners here.
Start by excavating a trench along your staked-out line. The trench should be at least 1.5 times the width of your average base boulder. For depth, the rule is to bury at least 10% of the wall's total height, plus another 6-8 inches for your gravel base. So, for a 3-foot (36-inch) wall, you'd want to bury about 4 inches of the first course, plus 6 inches of gravel, meaning a trench depth of at least 10 inches. A deeper trench provides more stability. This is a key principle of how to build a retaining wall with boulders.
Once the trench is dug, it needs to be perfectly level. Not 'close enough.' Perfectly. Use your level to check it from side to side and end to end. Any inconsistencies here will be magnified with every course you add. After leveling the soil at the bottom, it's time for the base material. Add 6-8 inches of ¾-inch clean crushed gravel. This is the material that provides a stable, load-bearing surface that also allows for drainage. This foundation work is quite similar to the prep needed for high-quality Concrete SAN Diego installations—it's all about what's underneath.
Now, compact it. For a small wall, you can use a hand tamper, slamming it down repeatedly until the gravel is completely locked in and doesn't shift under your feet. For larger projects, we always recommend renting a gas-powered plate compactor. It does a far better job in a fraction of the time. This unyielding, compacted base is the secret to a long-lasting structure. It is the absolute bedrock of how to build a retaining wall with boulders.
The Art of Stacking: A Real-Life Puzzle
With your foundation prepared, the real fun begins. Stacking is where engineering meets artistry. The goal is to create a structure that is both immensely strong and aesthetically pleasing. The first course is the most important. Select your largest, most stable boulders for this layer. Place them side-by-side in the trench, ensuring they are snug against each other and settled firmly into the gravel base. Wiggle each one to make sure it's solid. This base course dictates the strength for the entire project of how to build a retaining wall with boulders.
As you begin the second course, you'll apply the golden rule of stacking: one-over-two and two-over-one. This means every boulder should span the joint of the two boulders beneath it. This staggers the joints, much like a brick wall, and locks the entire structure together. Never, ever stack vertical joints on top of each other. That’s how you create a catastrophic failure point. This fundamental technique is at the heart of how to build a retaining wall with boulders.
Another critical concept is 'batter.' Your wall should not be perfectly vertical. It needs to lean back, or 'batter,' into the hillside it's retaining. A good rule of thumb is a setback of 1-2 inches for every foot of height. This uses gravity to your advantage, helping the wall resist the immense pressure of the soil behind it. You can use your string line as a guide to maintain a consistent batter as you build up. Our experience shows that proper batter is a non-negotiable part of how to build a retaining wall with boulders for long-term stability.
Fitting the boulders is a patient process. You’ll need to turn them, flip them, and test different combinations to find the tightest fit. Use your pry bar to make small adjustments. For small gaps, you can use stone shims (small, flat pieces of rock) to wedge them tight and prevent rocking. Every single boulder should be rock-solid before you move on to the next. If it wobbles, take it out and try again. A well-built wall feels like one solid mass, not a collection of individual stones. This meticulous process is what separates an amateur attempt from a professional execution of how to build a retaining wall with boulders.
Don't Forget Drainage: The Wall's Secret Weapon
So your wall is stacked and looks amazing. You're not done yet. Far from it. What you do behind the wall is just as important as the wall itself. This is the part that so many people get wrong in their attempt at how to build a retaining wall with boulders. As we mentioned earlier, water pressure (hydrostatic pressure) is the number one enemy of any retaining structure.
To combat this, you need to create a clear drainage path. Start by laying a sheet of professional-grade landscape fabric against the back of your wall. This permeable fabric allows water to pass through but prevents soil from clogging up your drainage zone. Extend the fabric up the back of the wall and over the soil behind it.
Next, backfill the space directly behind the wall with more ¾-inch clean crushed gravel. This creates a vertical drainage column. As water seeps through the soil, it will hit this gravel zone and travel straight down instead of pushing against your wall. For walls over three feet tall, we strongly recommend installing a perforated drain pipe at the base of this gravel column. Lay the pipe (holes facing down) in a bed of gravel, sloping it slightly to one end so it can drain out to daylight away from the wall. This is a professional-level step that guarantees your wall's longevity. This is how you truly master how to build a retaining wall with boulders.
Fill the gravel zone to within about 6-12 inches of the top of the wall. Then, you can fold the landscape fabric over the top of the gravel, like a burrito, to keep it clean. The final layer can be topped with topsoil for planting. This comprehensive drainage system is the signature of a professional job. It’s what ensures the entire structure can withstand the test of time and weather, a critical component of how to build a retaining wall with boulders.
Finishing Touches That Make a Difference
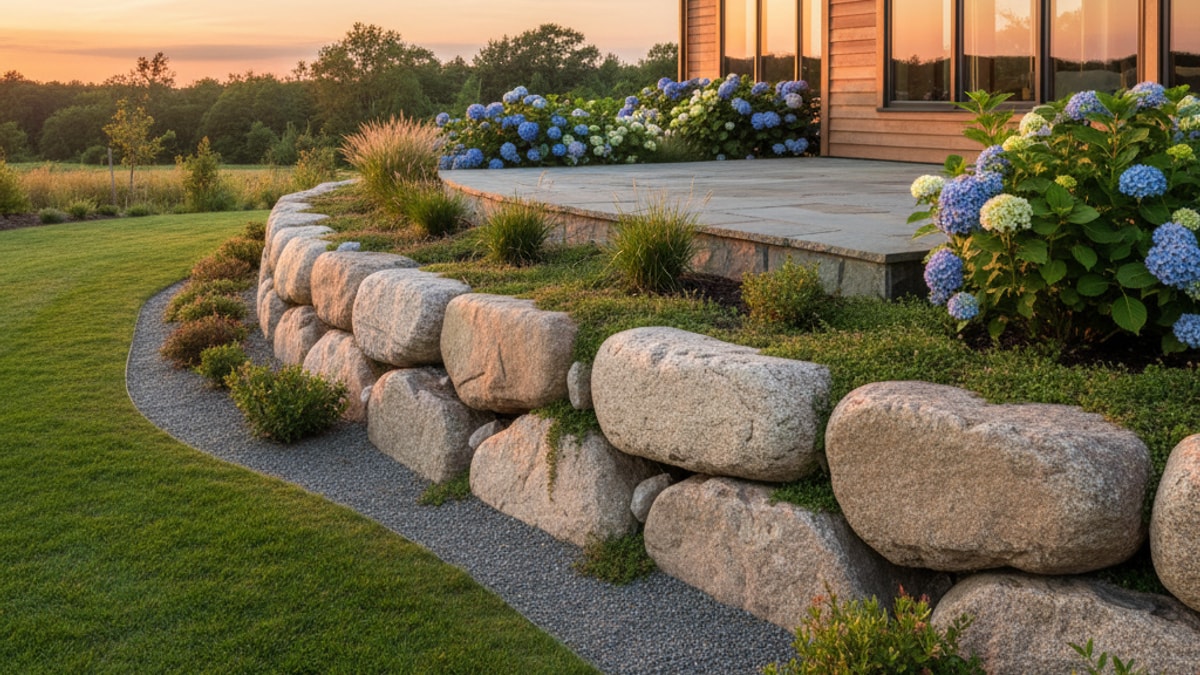
With the structural work complete, it's time for the finishing details that elevate the project. The final course of your wall is the capstones. These should be your flattest, most visually appealing boulders. They provide a finished look and help lock the top of the wall together. Spend time selecting and fitting these carefully. A well-executed capstone layer turns a functional wall into a beautiful landscape feature. In many of our projects, this top layer is designed to be multifunctional, which is the core idea behind our Seat Retaining Walls service—blending form and function perfectly.
Landscaping around your new wall is the final step. Planting cascading flowers, groundcovers, or small shrubs in the soil above the wall can soften its appearance and help with erosion control. Integrating the wall into the broader landscape is key. Perhaps it forms the border of a new patio featuring elegant Pavers SAN Diego, or maybe it incorporates Landscape Lighting SAN Diego to create dramatic nighttime effects. The possibilities are endless when you know how to build a retaining wall with boulders correctly.
Building a boulder wall is a formidable challenge. It demands respect for materials, an understanding of physics, and a great deal of patience and hard work. The satisfaction of creating such a permanent, beautiful structure with your own hands is immense. It's a project that connects you directly to the earth and leaves a lasting legacy on your property.
However, it's also a project with a very high margin for error. If you're looking at a steep slope, dealing with poor soil, or planning a wall over four feet high, we strongly urge you to consult with professionals. Our team is here to help. Ready to Upgrade Your Backyard? We can ensure the job is done safely, correctly, and beautifully the first time. Let’s Design the Outdoor Space You’ve Been Dreaming Of, with a stunning boulder wall as its anchor.


.webp)
.webp)