Building a retaining wall on a hillside isn't just about moving some earth and stacking blocks; it's a profound act of landscape transformation, a blend of engineering, artistry, and sheer practicality. For properties with challenging slopes, a well-constructed retaining wall is often the lynchpin for creating usable, beautiful outdoor spaces. We're talking about preventing erosion, managing water runoff, and carving out level areas for patios, gardens, or even Outdoor Kitchens SAN Diego – truly elevating a property's functionality and aesthetic appeal. Our team at Modern Yardz has spent years refining the process of designing and constructing these essential structures, understanding the intricate dance between soil dynamics, water management, and visual harmony.
It’s a project that demands careful consideration, detailed planning, and a deep understanding of structural integrity. Without a solid approach, a retaining wall can become a costly liability rather than an asset. That's why we’ve put together this comprehensive guide on how to build a retaining wall on a hillside, drawing directly from our collective experience and the best practices in the industry as of 2026. We're here to share the crucial steps, the common pitfalls, and the expert insights that make all the difference, ensuring your project stands strong for decades.
The Crucial First Step: Understanding Your Terrain and Regulations
Before you even think about buying materials or digging, you've got to understand the ground you're working with. Seriously, this isn't negotiable. When considering how to build a retaining wall on a hillside, the existing soil conditions are paramount. Is it sandy, clay-heavy, or a mix? What's its bearing capacity? Our team always recommends a professional geotechnical analysis for larger or critical projects. This analysis provides invaluable data about soil composition, stability, and groundwater levels, which directly impacts design and material selection. Trust us, skipping this can lead to catastrophic failure down the line.
Another non-negotiable step involves local building codes and permits. Regulations vary significantly, and in 2026, many jurisdictions are tightening requirements for hillside construction due to increased awareness of environmental impact and safety. You'll likely need a permit for any wall over a certain height (often 3-4 feet), and engineered drawings are almost always a prerequisite for more substantial structures. Our experience shows that partnering with a landscape design and build company like ours from the outset streamlines this often-complex process, ensuring compliance and peace of mind. We handle the paperwork, the engineering consultations, and the inspections, so you don't have to navigate that bureaucratic maze alone.
Designing for Durability: Engineering and Aesthetics
Once you know your site and the rules, it's time for design. This is where the vision truly takes shape. When figuring out how to build a retaining wall on a hillside, you're not just creating a barrier; you're shaping your outdoor living environment. Effective design considers both the structural demands and the aesthetic integration into your overall landscape vision. Will it be a sleek, modern look complementing Concrete SAN Diego patios, or a more rustic, natural stone aesthetic? This impacts everything.
For most significant hillside walls, an engineer's stamp is essential. We can't stress this enough. An experienced structural engineer will calculate the lateral earth pressure, hydrostatic pressure, and surcharge loads, then specify the wall's dimensions, reinforcement, and drainage system. These calculations are critical for ensuring the wall won't lean, crack, or collapse under the immense forces it will withstand. Our Landscape Design SAN Diego service integrates this engineering expertise directly into the creative process, ensuring beauty never compromises structural integrity.
Consider the height and length of the wall. Taller walls exert significantly more pressure and often require more robust construction methods, like reinforced concrete or tiered designs. Sometimes, building a series of shorter, stepped walls (terracing) is a more effective and aesthetically pleasing solution than one monolithic, towering structure. This approach can also create multiple usable levels for planting beds or walkways, making the hillside more accessible and functional.
Choosing Your Materials: Form Meets Function
The materials you select are vital for both the wall's performance and its visual impact. When planning how to build a retaining wall on a hillside, you have several excellent options, each with its own benefits and considerations. We've worked with them all, and our advice is always to balance durability, aesthetic preference, and budget.
- Segmental Retaining Wall (SRW) Blocks: These interlocking concrete blocks are incredibly popular for a reason. They're versatile, relatively easy to install for their strength, and come in a wide array of colors, textures, and sizes. Many SRW systems are designed to be mortarless, relying on gravity, friction, and pins for stability. They're excellent for curved designs and can achieve impressive heights when properly engineered.
- Natural Stone: For a timeless, organic look, natural stone is unmatched. Dry-stacked stone walls, with their irregular shapes and textures, blend seamlessly into natural landscapes. However, they require significant skill to build correctly, ensuring each stone interlocks for stability without mortar. Mortared stone walls offer even greater strength but lose some of that 'natural' feel. They're a beautiful, but often more labor-intensive and costly, option.
- Poured Concrete: This is the heavyweight champion for serious structural demands. Reinforced poured concrete walls offer unparalleled strength and can be designed to withstand immense pressures. They provide a clean, modern aesthetic, especially when faced with stucco, stone veneer, or textured finishes. They're typically the most expensive option due to formwork, concrete volume, and reinforcement, but for critical applications, they're often the best choice.
- Timber/Treated Lumber: While less common for major structural walls in 2026 due to concerns about longevity and maintenance, timber can be suitable for shorter, less critical walls or as a more rustic aesthetic. Pressure-treated timbers resist rot and insects, but even so, their lifespan is generally shorter than concrete or stone. For a more robust, long-lasting timber look, consider using large, heavy-duty landscape timbers or even railroad ties (though environmental concerns exist with older, creosote-treated ties).
Here's a quick comparison to help you weigh your options:
| Feature |
Segmental Blocks (SRW) |
Natural Stone (Dry-stacked) |
Poured Concrete (Reinforced) |
Timber (Treated) |
| Strength/Durability |
High; excellent for moderate to significant heights |
Moderate to High; dependent on skill and stone type |
Very High; superior for critical structural needs |
Low to Moderate; limited lifespan (15-25 years) |
| Aesthetics |
Versatile; various colors/textures; modern to traditional |
Organic, rustic, timeless; blends with nature |
Modern, clean; customizable with finishes |
Rustic, natural; can look dated if not maintained |
| Installation Ease |
Moderate; interlocking systems simplify stacking |
High skill required; time-consuming, heavy lifting |
High; requires forms, rebar, heavy equipment |
Moderate; cutting and fastening required |
| Cost (Materials) |
Moderate |
High (especially for quality stone) |
High (concrete, rebar, forms) |
Low to Moderate (less for DIY, higher for large timbers) |
| Maintenance |
Low; occasional cleaning |
Low; occasional weeding, checking for settling |
Low; occasional sealing/cleaning |
High; regular inspection for rot, pests, warping |
| Best Use |
Terracing, curved walls, residential/commercial |
Decorative, lower walls, naturalistic landscapes |
Large, critical walls, commercial, modern designs |
Low, non-critical walls; temporary solutions |
Our team often works with Seat Retaining Walls which combine the functional need for earth retention with integrated seating, adding immense value and usability to your outdoor space. It's about maximizing both form and function.
The Step-by-Step Build Process: How to Build a Retaining Wall on a Hillside
Alright, with planning and materials sorted, let's get into the practical steps of how to build a retaining wall on a hillside. This is where precision and proper technique are absolutely paramount. Cutting corners here will inevitably lead to problems.
1. Site Preparation and Excavation
This isn't just about digging a ditch. You're creating the very foundation. First, clear the area of any vegetation, debris, and existing structures. Mark out the wall's precise location and height according to your engineered plans. Then, excavate the trench for the wall's footing. This trench needs to be wide enough to accommodate the wall and the critical drainage system behind it, and deep enough to extend below the frost line (if applicable in your region) and provide a stable base.
For a hillside, you'll be cutting into the slope, which means managing the excavated soil. Our team uses specialized equipment to ensure precise cuts and efficient removal of material, minimizing disruption to the rest of your property. Remember, the deeper and more stable your base, the longer your retaining wall will last. We mean this sincerely: it runs on genuine connections to the earth.
2. Creating a Solid Foundation (Footing)
This is arguably the most critical step when you're learning how to build a retaining wall on a hillside. A sturdy, level foundation is non-negotiable for the wall's long-term stability. For SRW blocks, we typically lay a compacted base of crushed gravel (often 6-12 inches deep, depending on wall height and soil conditions). This gravel base must be perfectly level and compacted in lifts (layers) using a plate compactor. A slight forward or backward tilt might be specified by the manufacturer or engineer to help the wall lean into the hillside, increasing stability.
For poured concrete walls, the footing will involve rebar reinforcement and pouring concrete into forms, creating a monolithic base. This requires careful alignment and curing. Whatever the material, ensure the base extends sufficiently beyond the front and back of the wall to distribute the load effectively. Our team has found that a meticulously prepared foundation prevents uneven settling and future cracks, saving significant headaches down the line.
3. Implementing the Drainage System
Water is the archenemy of retaining walls. Hydrostatic pressure, caused by water accumulating behind the wall, can exert immense force, leading to bulging, cracking, or even total failure. This is why a robust drainage system is a critical, non-negotiable element when considering how to build a retaining wall on a hillside. It's becoming increasingly challenging to stress this enough.
The most common approach involves placing a perforated drain pipe (often a 4-inch corrugated pipe with fabric sock) behind the base of the wall, leading to an outlet where water can safely drain away from the structure. This pipe is then surrounded by a layer of clean, coarse gravel (typically 12-24 inches deep), which allows water to filter down to the pipe. A layer of geotextile fabric is often placed between the gravel backfill and the existing soil to prevent soil particles from clogging the drainage system. This system ensures that water never builds up behind the wall, alleviating pressure.
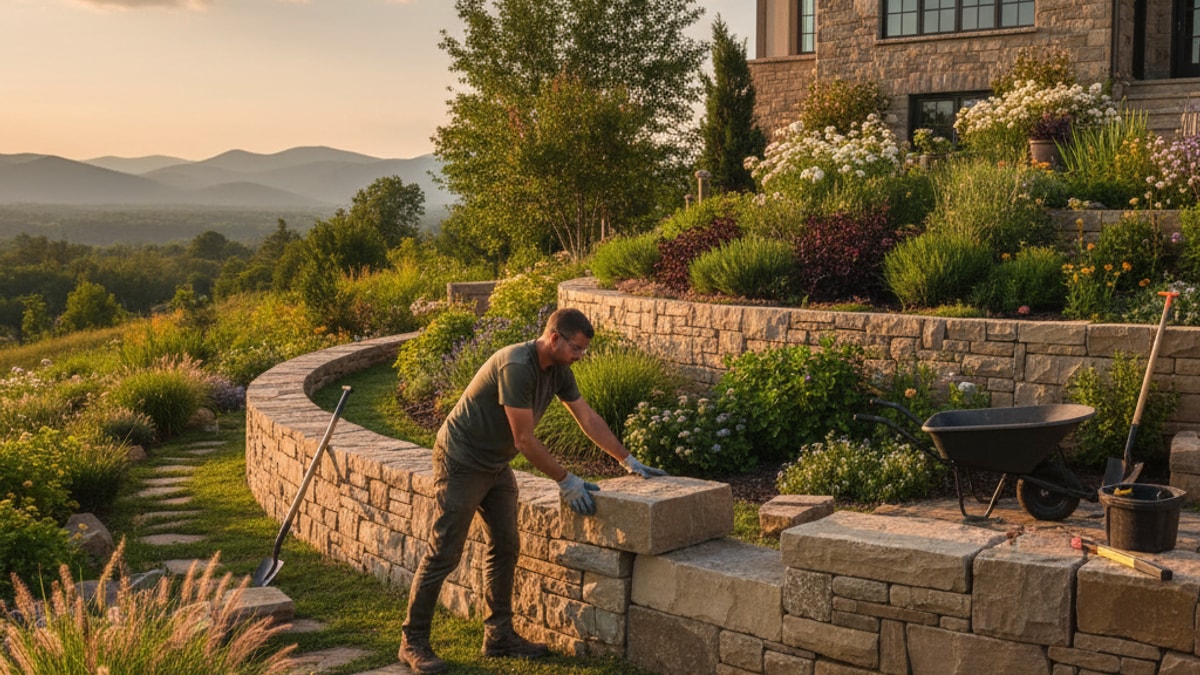
4. Laying the Wall Material (Lifts)
Now, the actual wall building begins. Whether you're using SRW blocks, natural stone, or pouring concrete, the process involves building the wall in layers, or 'lifts.'
- SRW Blocks: Lay the first course of blocks on your perfectly level gravel base. Ensure they are straight and level. Use a string line to maintain alignment. Subsequent courses are stacked, often staggering the joints (like brickwork) for added strength. Many SRW systems use pins or lip-and-groove designs to interlock blocks. After every 1-2 courses, backfill the area behind the wall with compacted drainage gravel, then a layer of compacted soil. This incremental backfilling is crucial for stability.
- Natural Stone: This requires an artistic eye and a strong back. Select stones that fit snugly, minimizing gaps. Use smaller stones (shims) to level larger ones. Dry-stacked walls rely on the weight and interlock of the stones themselves. For mortared walls, mortar is applied between courses.
- Poured Concrete: This involves setting up forms, placing rebar according to engineered plans, and then pouring concrete in stages or a single pour, depending on the wall's height and design. Vibration is used to eliminate air pockets, ensuring a dense, strong wall.
Our team rigorously checks level and alignment at every single course. That's the key. We've seen it work for countless projects, building everything from foundational Pavers SAN Diego installations to custom Pools AND Spas where precise leveling is absolutely critical.
5. Incorporating Geogrid (For Taller Walls)
For taller or more heavily loaded retaining walls on hillsides, geogrid reinforcement is almost always a requirement. Geogrid is a polymer mesh material that's laid horizontally between courses of the wall blocks and extends back into the compacted soil fill. It acts like a tensile reinforcement, tying the wall face into the soil mass behind it, creating a much larger, stronger composite structure. This prevents the soil mass from pushing the wall outward.
The length and frequency of geogrid layers are determined by the engineer based on wall height, soil conditions, and surcharge loads. It's a critical component for structural integrity, especially when you're truly asking a lot of your wall.
6. Backfilling and Compaction
Proper backfilling is just as important as the wall itself. The material directly behind the wall should be permeable drainage gravel (as part of your drainage system). Beyond that, fill material needs to be compacted in thin layers (typically 6-12 inches, or 'lifts') to achieve maximum density. Using a plate compactor is essential here. Poor compaction can lead to settling, which can then put uneven pressure on your wall, compromising its stability. Honestly, though, this step is often underestimated in its importance.
7. Finishing Touches: Caps, Aesthetics, and Planting
Once the wall is built and backfilled, it's time for the aesthetic elements. Many SRW systems offer matching capstones that are adhered to the top course, providing a finished look and protecting the blocks below. For poured concrete, you might apply a stucco finish, stone veneer, or decorative paint. This is also where you might consider integrating Landscape Lighting SAN Diego to highlight the wall and enhance nighttime ambiance.
Planting on and around a retaining wall can dramatically improve its appearance and even contribute to soil stability on the slope above. Groundcovers, shrubs, and cascading plants can soften the hard lines of the wall and integrate it more naturally into the landscape. Just be sure to choose plants with appropriate root systems that won't compromise the wall's structure over time. We often incorporate thoughtful planting as part of our comprehensive Landscape Design SAN Diego services.
The Long-Term View: Maintenance and Professional Oversight
Even after successfully figuring out how to build a retaining wall on a hillside, your work isn't entirely done. Like any significant landscape feature, retaining walls benefit from occasional inspection and maintenance. Keep an eye out for signs of distress: cracks, bulging, leaning, or excessive settling of the soil behind the wall. Ensure that the drainage outlets remain clear and aren't blocked by debris. Over time, heavy rainfall or seismic activity can test even the most robust structures.
If you notice any significant issues, it's always best to consult with professionals immediately. Trying to fix a failing retaining wall yourself can be dangerous and often exacerbates the problem. Our team at Modern Yardz has the expertise to assess existing walls, recommend repairs, or even undertake complete rebuilds if necessary. We're committed to the longevity and safety of every outdoor space we create, whether it's a simple garden wall or a multi-tiered system supporting an entire Artificial Turf SAN Diego area.
Remember, building a retaining wall on a hillside is a substantial undertaking that significantly impacts your property's value, safety, and usability. While a DIY approach might seem appealing for smaller projects, the complexities of engineering, local regulations, and the sheer physical demand often warrant professional assistance. For us, it’s about ensuring that your vision for your outdoor space is not only realized beautifully but also stands the test of time and the elements. We're here to help you achieve that peace of mind. We can't stress this enough: a properly built retaining wall is an investment that pays dividends in stability, beauty, and usable space for years to come. Let's design the outdoor space you've been dreaming of, ensuring every element, including your retaining wall, is perfectly executed.
Our team understands the challenges and opportunities slopes present, and we're ready to bring our deep industry expertise to your project. From the initial soil analysis to the final capstone, we pride ourselves on precision, durability, and stunning results. If you’re considering how to build a a retaining wall on a hillside, or any other significant Fire Features or outdoor living space, we invite you to explore our full range of services and see how we can transform your outdoor space into something extraordinary. Ready to upgrade your backyard? Our collective expertise is at your disposal, ensuring your project is handled with the utmost care and professional insight. We’ve been helping homeowners create amazing outdoor environments for years, and we're just as passionate about your project as you are.


.webp)
.webp)