Building a landscape timber retaining wall isn't just about holding back soil; it's about shaping your environment, defining spaces, and adding a compelling layer of visual interest to your property. Here at Modern Yardz, we've seen firsthand the dramatic impact a thoughtfully designed and meticulously constructed retaining wall can have. It's a project that, while demanding, offers immense satisfaction and adds significant value to your home.
Maybe you're contending with a sloped yard that's hard to utilize, or perhaps you're simply dreaming of tiered garden beds that bring structure and elegance. Whatever your motivation, understanding how to build a landscape timber retaining wall correctly is crucial. We're talking about more than just stacking wood; we're talking about engineering, aesthetics, and long-term durability. Our team often guides clients through these considerations, and we're excited to share our accumulated wisdom with you, ensuring you're well-equipped for this rewarding endeavor.
Why Choose Timber for Your Retaining Wall?
When you're contemplating how to build a landscape timber retaining wall, the choice of material is one of your first, most significant decisions. While stone, concrete blocks, and even gabions have their merits, timber offers a unique blend of natural beauty, cost-effectiveness, and relative ease of installation for many DIY enthusiasts. It's a classic choice, and for good reason.
Timber seamlessly integrates with most outdoor aesthetics, lending a warm, organic feel that other materials often struggle to replicate. From a practical standpoint, it's generally lighter and easier to cut and maneuver than masonry, which can be a huge advantage if you're tackling this project yourself. Our experience shows that for walls under four feet, timber is an incredibly versatile and robust option. Of course, we're talking about properly treated landscape timbers designed for ground contact, not just any old lumber you find lying around. That's a critical, non-negotiable element. The right materials make all the difference when you're learning how to build a landscape timber retaining wall that truly lasts.
Planning Your Project: The Foundation of Success
Honestly, though, the planning stage is where most projects either thrive or falter. Before you even think about picking up a shovel, you need a meticulous plan. We can't stress this enough: measure twice, cut once, and plan five times. This isn't just a catchy phrase; it's the bedrock of a successful build, especially when you're figuring out how to build a landscape timber retaining wall that's structurally sound.
First, assess your site. What's the slope like? Where does water naturally flow? Are there any underground utilities you need to be aware of? Always call 811 (or your local equivalent) before you dig—it's a simple, free service that can save you from catastrophic mistakes. Determine the height and length of your proposed wall. For walls over three or four feet, we strongly recommend consulting a structural engineer or a professional landscape design team. Taller walls exert immense pressure and require specialized design and permitting. Even for smaller projects, understanding local building codes is absolutely vital in 2026. Different regions have varying requirements for retaining wall construction.
Think about the purpose of your wall. Is it purely aesthetic, or does it need to hold back a significant amount of earth? This will influence your design, particularly the depth of your foundation and the type of drainage you'll need. Our team often helps clients visualize these elements through detailed Landscape Design consultations, ensuring every aspect is considered before ground is even broken. This approach (which we've refined over years) delivers real results.
Gathering Your Arsenal: Tools and Materials You'll Need
Now, this is where it gets interesting: the shopping list. Having the right tools and materials isn't just convenient; it's essential for safety, efficiency, and achieving a professional finish when you're tackling how to build a landscape timber retaining wall. Don't skimp here; quality tools make the job so much easier.
Key Tools:
- Shovel and spade
- Post-hole digger (for deadmen anchors)
- Level (a long carpenter's level and a string level are invaluable)
- Tape measure
- Circular saw or miter saw (with blades suitable for treated lumber)
- Drill (cordless is best)
- Impact driver (for heavy-duty fasteners)
- Sledgehammer
- Rubber mallet
- Wheelbarrow
- Safety glasses and gloves
- Tamper (manual or powered)
Essential Materials:
- Landscape Timbers: Pressure-treated for ground contact is non-negotiable. Look for timbers rated for outdoor, direct-ground use.
- Rebar: Typically 1/2-inch or 5/8-inch, cut into 2-foot lengths for pinning layers.
- Galvanized Spikes or Timber Screws: Long enough to penetrate multiple layers, usually 8-10 inches.
- Gravel (Drainage Rock): 1/2-inch to 3/4-inch clean crushed gravel, crucial for drainage.
- Perforated Drainage Pipe (Weeping Tile): 4-inch diameter, typically rigid or flexible PVC.
- Landscape Fabric: Heavy-duty, non-woven fabric to separate soil from gravel.
- Cap Timbers (Optional): For a finished top course.
Our team has found that investing in good quality materials from the outset prevents headaches down the line. It's a small upfront cost for significant long-term peace of mind. We recommend familiarizing yourself with different timber treatments, as they offer varying levels of protection and longevity.
| Timber Treatment Type |
Primary Benefit |
Typical Lifespan (Ground Contact) |
Considerations |
| CCA (Chromated Copper Arsenate) |
Highly Effective Preservative |
40+ years |
Restricted for residential use in many areas due to arsenic content. Primarily industrial. |
| ACQ (Alkaline Copper Quaternary) |
Residential-Safe, Good Protection |
20-30 years |
Can be corrosive to fasteners; use hot-dipped galvanized or stainless steel. |
| CA (Copper Azole) |
Residential-Safe, Excellent Protection |
20-30+ years |
Similar to ACQ regarding fastener corrosion; use appropriate hardware. |
| MCQ (Micronized Copper Quaternary) |
Residential-Safe, Less Corrosive |
20-30+ years |
Newer technology, often preferred for its reduced corrosiveness to fasteners. |
The Build Begins: Step-by-Step Construction
Alright, the planning's done, materials are on-site. It's time to learn how to build a landscape timber retaining wall, step by laborious, yet immensely gratifying, step. This is where your careful preparation truly pays off.
Step 1: Digging the Trench
Your first course of timbers needs a solid, level foundation. Dig a trench that's at least 6 inches deep and wide enough to accommodate your timbers, plus a little extra room for backfill. The depth will depend on your wall's height; for a 2-foot wall, a 6-inch trench is usually adequate. For every foot of wall height, you'll want to bury approximately 1 inch of timber. This helps immensely with stability. Use your string line and level to ensure the bottom of this trench is perfectly level. This is paramount. A crooked base means a crooked wall, and that's not what we're aiming for here at Modern Yardz.
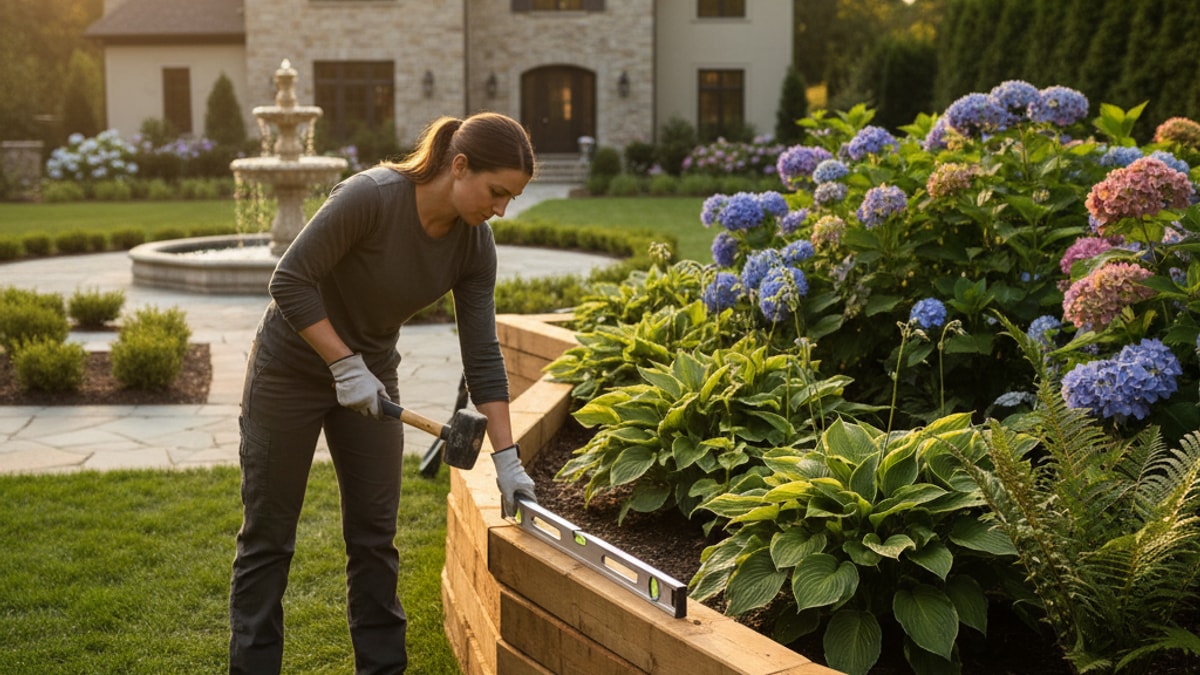
Step 2: Laying the First Course
Place your first course of landscape timbers into the trench. Butt them tightly together end-to-end. Use your level frequently, both along the length of each timber and across its width. Adjust with gravel or sand underneath as needed until each timber is perfectly level. This initial course dictates the integrity of your entire wall. It's comprehensive. Many people ask us how to build a landscape timber retaining wall and this first step is often underestimated in its importance.
Step 3: Adding Drainage
This is a critical, non-negotiable element for longevity. Lay your perforated drainage pipe along the back of the first timber course, ensuring the holes face down or towards the retaining material. Cover the pipe and the entire back area of the trench with at least 6-12 inches of clean crushed gravel. Wrap this gravel in landscape fabric, bringing it up behind where your wall will stand. The fabric prevents soil from migrating into your gravel, keeping the drainage system clear. We've seen walls fail prematurely because this step was skipped; water pressure is a formidable force.
Step 4: Stacking Subsequent Courses
Now, the vertical build begins. Lay the second course of timbers, staggering the joints like bricks in a wall. This provides strength and prevents long, continuous seams. Use galvanized spikes or timber screws to fasten each timber to the course below it. Drive these fasteners down through the top timber and well into the one beneath. For added stability, especially in taller walls or those under significant pressure, consider using rebar. Drill pilot holes through the timbers and drive 1/2-inch or 5/8-inch rebar down through multiple courses, into the ground below. This creates a formidable anchor.
Step 5: Incorporating Deadmen (For Taller Walls)
If you're wondering how to build a landscape timber retaining wall that's taller than, say, three feet, deadmen anchors become vital. These are T-shaped timber assemblies buried horizontally into the hillside, extending back into the undisturbed soil, typically every 4-6 feet along the wall's length and every two courses vertically. They tie the wall back into the earth, providing incredible resistance against outward pressure. It's a bit more work, but it's a game-changer for stability.
Step 6: Backfilling and Compacting
As you build up your wall, backfill the area behind it with good quality drainage gravel, then a layer of native soil. Compact each layer thoroughly with a tamper. This prevents future settling and helps reinforce the wall. We can't stress this enough: proper compaction is key. Skipping this step can lead to significant, sometimes dramatic, wall movement over time.
Step 7: Finishing Touches and Cap Timbers
Once your wall reaches its desired height, you might want to add a cap course. These timbers are typically laid flat on top of the final course, offering a clean, finished look and often serving as a functional seating area. Secure them firmly with timber screws or spikes. Ensure all exposed ends are cut cleanly and consider applying an exterior wood sealant for added protection. This enhances both the aesthetic and the longevity of your landscape timber retaining wall.
Ensuring Longevity: Drainage and Finishing Touches
We've touched on drainage, but it truly deserves its own moment in the spotlight when discussing how to build a landscape timber retaining wall. A retaining wall's worst enemy is hydrostatic pressure – the force exerted by water trapped behind it. Without adequate drainage, this pressure will relentlessly push against your wall, eventually leading to bowing, cracking, or even catastrophic failure. It's not a question of 'if,' but 'when.'
Our team always emphasizes a multi-pronged approach to drainage. The perforated pipe at the base, surrounded by clean gravel and separated by landscape fabric, is your primary defense. But also consider the surface drainage above the wall. Divert runoff away from the wall's face and top. Sometimes, adding a small swale or French drain a few feet up the slope can make a world of difference. Proper Seat Retaining Walls construction, which often includes timber options, always integrates robust drainage solutions.
Beyond drainage, the finishing touches are what elevate a functional structure into a beautiful landscape feature. Think about how the wall integrates with the rest of your yard. Are there opportunities for plantings that soften its lines? Perhaps a built-in planter box using the same timbers? These thoughtful additions transform a simple wall into a cohesive part of your outdoor living space. That's the reality. It all comes down to careful planning and execution.
Maintenance for Years of Beauty
Even after you've mastered how to build a landscape timber retaining wall, your work isn't entirely done. Like any outdoor structure, it benefits from ongoing care. Regular maintenance ensures your wall continues to perform its function and maintain its aesthetic appeal for decades.
Inspect your wall annually, ideally in the spring. Look for any signs of rot, insect damage, or shifting timbers. Check the fasteners – sometimes spikes can work their way loose. Ensure the drainage system isn't clogged; clear any debris from the weep holes or gravel bed. If you notice any significant movement or leaning, it's time to address it immediately. Small problems are always easier and less costly to fix than large ones. Reapplying a wood preservative or sealant every few years, particularly to the top course, will also significantly extend the life of your timbers, protecting them from the relentless sun and rain.
When to Call the Experts
While knowing how to build a landscape timber retaining wall can be incredibly empowering, there are definitely times when professional intervention is the smartest, safest, and most cost-effective route. This is especially true for projects that involve significant elevation changes, poor soil conditions, or complex designs. For instance, if your proposed wall is over four feet tall, or if there's a structure or valuable asset immediately uphill that could be impacted by wall failure, our team wholeheartedly recommends bringing in the pros. We've seen it all, and the cost of repairing a failed wall far outweighs the initial investment in expert design and construction.
Modern Yardz specializes in comprehensive outdoor transformations. If your vision for your property extends beyond a simple retaining wall to include features like Outdoor Kitchens, luxurious Pools and Spas, or even integrated Fire Features, we're equipped to handle every step. We often incorporate expertly crafted Seat Retaining Walls into our larger Landscape Design projects, ensuring they're both functional and stunning. Our approach ensures that every element of your outdoor space works harmoniously, creating a cohesive and enduring environment. We're here to help you navigate the complexities and bring your vision to life, whether it's a standalone timber wall or part of a grander outdoor living area. Ready to Upgrade Your Backyard? We've got you covered.
FAQs About Building Landscape Timber Retaining Walls
Q: How high can I build a landscape timber retaining wall myself?
A: For DIY projects, we generally recommend limiting timber retaining walls to 3-4 feet in height. Walls taller than this exert significant pressure and often require professional engineering, special permits, and more advanced construction techniques to ensure safety and stability. Always check local building codes first.
Q: What type of timber should I use for ground contact?
A: You absolutely must use pressure-treated landscape timbers specifically rated for 'ground contact' or 'below ground' applications. These timbers have a higher concentration of preservatives that protect against rot and insect infestation, which is crucial for their longevity in direct contact with soil.
Q: Is drainage really that important for a timber retaining wall?
A: Yes, drainage is perhaps the single most critical factor for the long-term stability and lifespan of your retaining wall. Without proper drainage, water can build up behind the wall, creating immense hydrostatic pressure that will eventually cause the wall to bow, shift, or fail entirely. Don't skip this step.
Q: How do I prevent my timber retaining wall from rotting?
A: Beyond using ground-contact treated timbers and ensuring excellent drainage, regular maintenance helps immensely. Consider applying a good quality exterior wood sealant or preservative every few years, especially to the top course and any exposed ends. This adds an extra layer of protection against moisture and UV damage.
Q: Can I build a curved landscape timber retaining wall?
A: Building a gently curved timber retaining wall is certainly possible, but it requires more precise cuts and careful alignment. You'll need to make angled cuts on the ends of your timbers to create the curve, which can be more challenging than a straight wall. It's often easier with smaller timbers or by segmenting the curve.
Q: What's the best way to secure the timbers together?
A: We recommend using heavy-duty galvanized timber spikes (8-10 inches long) or structural timber screws, driven through each course into the one below it. For taller or more critical walls, driving rebar through pre-drilled holes, extending deep into the ground, provides superior anchoring and stability.
Q: How often should I inspect my timber retaining wall?
A: We suggest a thorough inspection at least once a year, preferably in the spring after the winter's freeze-thaw cycles. Look for signs of shifting, bowing, rot, insect damage, or loose fasteners. Addressing small issues quickly prevents them from becoming larger, more costly problems.
Q: Do I need a permit to build a landscape timber retaining wall?
A: Permitting requirements vary significantly by local jurisdiction and wall height. Many areas require permits for walls over a certain height, typically 3 or 4 feet, or if the wall is near property lines or public utilities. Always check with your local planning department before starting any construction in 2026.
Q: What are 'deadmen' anchors and why are they used?
A: Deadmen anchors are T-shaped timber assemblies buried horizontally into the hillside behind the wall, extending back into undisturbed soil. They are used for taller retaining walls to tie the wall directly into the earth, providing substantial resistance against the outward pressure of the soil. They're a key structural component.
Q: Can I plant directly behind a timber retaining wall?
A: Yes, you can plant directly behind a timber retaining wall once it's properly constructed and backfilled. In fact, plants can help stabilize the soil with their root systems. Just be mindful of the type of plants; avoid large trees with aggressive root systems that could eventually compromise the wall's integrity.
Q: How long does a well-built timber retaining wall typically last?
A: A properly planned, constructed, and maintained landscape timber retaining wall, using ground-contact pressure-treated timbers, can easily last 20 to 30 years or even longer. Factors like climate, soil conditions, and the quality of the initial build and drainage all play a significant role in its overall lifespan.
Q: What are the main challenges of building a timber retaining wall?
A: The primary challenges include ensuring a perfectly level and stable foundation, managing proper drainage to prevent hydrostatic pressure, accurately cutting and aligning timbers, and providing sufficient anchoring, especially for taller walls. It's a physically demanding project that requires precision and patience.
Q: Should I use gravel or sand for the trench base?
A: While sand can provide a level base, we generally recommend using a layer of compacted gravel (like crushed rock or decomposed granite) for your trench base. Gravel provides better drainage, prevents timber movement, and offers a more stable, non-shifting foundation for your first course of timbers.
Q: What if my timbers start to rot after a few years?
A: If you notice signs of rot, especially in specific timbers, prompt action is essential. For minor, localized rot, you might be able to replace individual timbers. However, widespread rot often indicates a deeper issue, possibly with drainage or initial material quality, and might necessitate a more substantial repair or even reconstruction. Addressing drainage first is key.
Building a landscape timber retaining wall is a significant undertaking, but it's one that can dramatically enhance your outdoor living space. It's about blending functionality with aesthetic appeal, creating a landscape that truly resonates with your lifestyle. Let's Design the Outdoor Space You've Been Dreaming Of; our expertise can make that vision a reality.


.webp)
.webp)