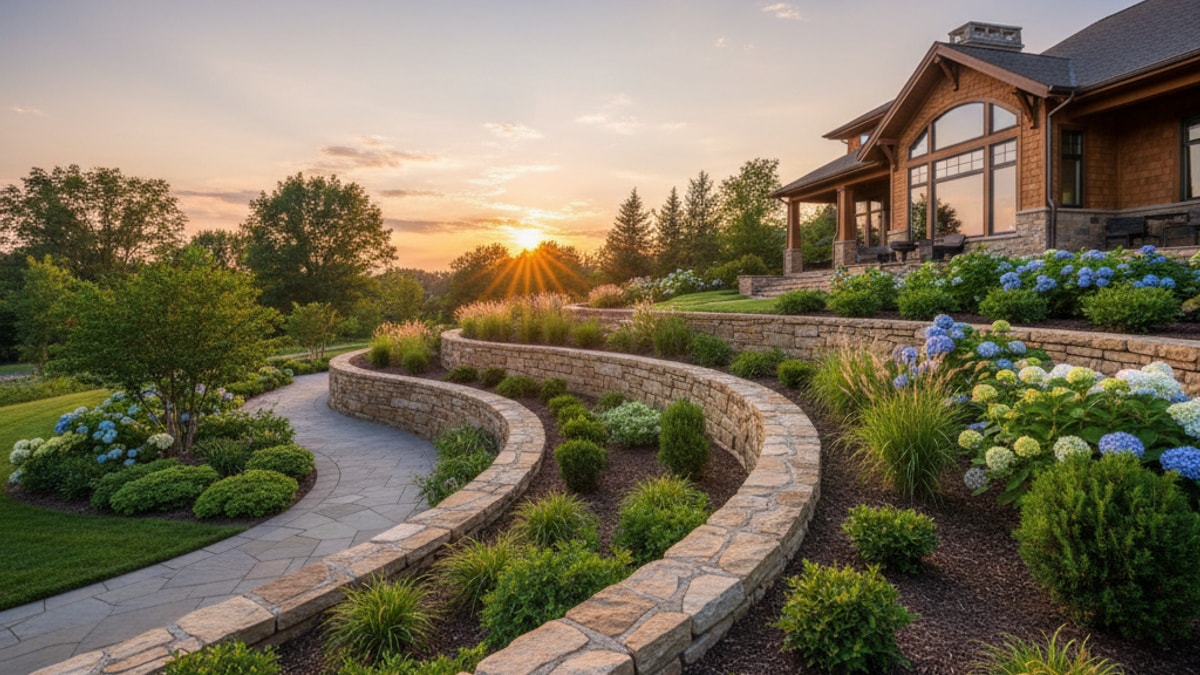
Why Curves are Worth the Effort
Let’s be honest. A straight line gets the job done, but a curve? A curve creates art in your landscape. It introduces a soft, organic flow that rigid, straight walls simply can't replicate. In our years of custom Landscape Design SAN Diego work, we've seen firsthand how a sweeping arc can transform a mundane slope into a stunning focal point. It’s a significant, sometimes dramatic shift. A curved wall can create an intimate nook for a fire pit, define a meandering garden path, or simply add a sophisticated, high-end feel to your property. It’s more than just holding back soil; it’s about shaping an experience.
But we get it. The idea of learning how to build a curved retaining wall can feel formidable. The geometry seems complex, the cuts intimidating, and the margin for error small. While it’s true that curves demand more precision than straight walls, the process is absolutely achievable with the right knowledge and a methodical approach. We've found that the biggest hurdles aren't in the construction itself, but in the planning. Get that right, and you're more than halfway to a beautiful, stable wall that will last for decades. This guide is built from our team's collective experience, designed to demystify the process and give you the confidence to tackle it. The fundamental question of how to build a curved retaining wall is one we answer for clients all the time, and now we're sharing those insights with you.
Before You Dig: The Critical Planning Phase
We can't stress this enough: your wall's success is determined long before you ever pick up a shovel. This is the phase where you prevent catastrophic failures down the road. A little extra time spent here saves a world of heartache later. The first step in how to build a curved retaining wall properly is a thorough site assessment. What kind of soil are you working with? Is it sandy, loamy, or heavy clay? This dictates your drainage and base requirements. How steep is the slope? Taller walls on steeper slopes require professional engineering and reinforcement. And where is water going to go? Poor drainage is the number one killer of retaining walls, as hydrostatic pressure can literally push a wall over from behind.
Once you've assessed the site, it’s time to design the curve itself. This is the fun part. A simple garden hose or a long piece of rope is your best friend here. Lay it out on the ground and play with different arcs until you find a shape that feels right for the space. Avoid curves that are too tight, as they can be difficult to build with standard blocks and may look awkward. A gentle, sweeping radius is almost always more aesthetically pleasing. When you’ve found the perfect curve, mark it clearly with landscape marking paint. This painted line is your unflinching guide for excavation. The planning phase for how to build a curved retaining wall also involves choosing your materials—a decision that dramatically impacts the project's difficulty and final look. Many homeowners planning larger projects, such as integrating a wall with new Pools AND Spas, find this is the perfect time to bring in a design team.
Choosing Your Weapon: Wall Materials Matter
The blocks or stones you choose will define both the look and the construction process. This isn't just an aesthetic choice; it’s a practical one that directly influences how to build a curved retaining wall with ease versus frustration. For most DIYers, Segmental Retaining Wall (SRW) blocks are the answer. These concrete blocks are engineered to interlock, and many systems offer specific 'tapered' blocks designed for curves. These trapezoidal blocks fit together snugly on a radius, creating a smooth, professional-looking arc with minimal effort and no cutting.
Your other option is to use standard rectangular SRW blocks. You can still build a beautiful curve with them, but it requires more work. On a gentle curve, the blocks will have small, V-shaped gaps at the back, which you'll fill with drainage stone. On a tighter curve, you’ll need to cut the back corners off some blocks with a diamond-blade saw to make them fit. This is more labor-intensive but can be a cost-effective solution. Then there’s natural stone. It offers unparalleled, rustic beauty but is the most challenging material to work with. Building a stable, curved stone wall requires a stonemason's skill to fit irregular shapes together securely. For large-scale or complex projects, sometimes a poured concrete wall, a service covered by our Concrete SAN Diego team, provides the ultimate in strength and custom shaping.
| Feature |
Tapered SRW Blocks |
Standard SRW Blocks |
Natural Stone |
| Ease of Use |
Easiest |
Moderate (requires cutting) |
Most Difficult |
| Curve Type |
Smooth, consistent curves |
Segmented, requires skill |
Irregular, organic curves |
| Cost |
$$ |
$ |
$$$$ |
| Labor |
DIY-friendly |
Moderate DIY / Pro |
Professional recommended |
| Our Take |
The go-to for most homeowners. Reliable and looks fantastic, making it the top answer for how to build a curved retaining wall efficiently. |
A budget option if you're comfortable with a wet saw. |
Unmatched beauty, but a significant investment in time and skill. |
The Foundation: Your Wall's Unsung Hero
A retaining wall is only as strong as its foundation. Period. This is a critical, non-negotiable element of the build, and skimping here guarantees failure. The process begins with excavating a trench along the painted line you marked. The trench should be deep enough to bury at least half of your first course of blocks (typically 4-6 inches) plus another 6 inches for the gravel base. The width should be about twice the depth of your block, giving you room to work. The core of how to build a curved retaining wall that lasts for generations is this foundation.
Inside this trench, you'll build the leveling pad. This is a 6-inch-deep layer of compactible gravel, like 3/4-inch crushed stone. Do not use pea gravel or sand—they don't lock together and will shift over time. Add the gravel in 3-inch layers, or 'lifts,' and use a hand tamper or plate compactor to pack it down until it's rock solid. This is a workout, but it's absolutely essential. We've seen it work time and time again. The final, and most important, step is to get this base perfectly level. Use a 4-foot level along the length of the curve and a torpedo level from front to back. Take your time. Make adjustments by adding or removing small amounts of gravel. A perfect first course depends on a perfect base. This meticulous attention to detail is the secret to how to build a curved retaining wall that looks professional.
Laying the Courses: Building Up Your Curve
With a perfectly level base, you're ready to start building. The first course is the most important, as it dictates the accuracy of the entire wall. Set each block on the gravel base, tapping it into place with a rubber mallet. Check for level in every direction—side to side, front to back, and with the neighboring blocks. Make sure each block is pressed firmly against the next one, following your painted guideline. Once the first course is set, you have the template for how to build a curved retaining wall that follows your intended design. Backfill in front of and behind the first course with soil and gravel to lock it in place before moving up.
For subsequent courses, you'll use a standard running bond pattern, staggering the joints so that each block sits over the seam of the two blocks below it. This is what gives the wall its structural integrity. Most SRW blocks have a lip or pin system that automatically creates the correct setback, causing the wall to lean back slightly into the hillside for stability. As you add each course, you must backfill behind it. Don't wait until the wall is finished! The process is simple: lay a course of blocks, fill the space behind it with at least 12 inches of 3/4-inch drainage stone, and then compact it. This drainage zone is critical for relieving hydrostatic pressure. Forgetting this step is a common but devastating mistake for those learning how to build a curved retaining wall.
Now, let's talk about drainage pipe. This is not optional. Behind your first course of blocks, at the bottom of the wall, you need to lay a 4-inch perforated drainpipe wrapped in a fabric sock. The sock prevents silt from clogging the pipe's holes. This pipe will collect water that seeps down through the drainage stone and carry it away from the wall, exiting at either end of the wall into a safe area (a 'daylight' exit). This single component is a formidable defense against the immense power of water pressure, a core principle in knowing how to build a curved retaining wall correctly.
The Finishing Touches That Make a Difference
Your wall is built, but it’s not finished. The details are what separate an amateur-looking project from a professional installation. The most important finishing touch is the wall cap or capstone. These are flat, smooth blocks that provide a clean, finished top surface. They are secured to the top course of your wall using a high-strength concrete adhesive, applied with a caulking gun. For a curve, you'll need to cut the caps to follow the arc perfectly. The easiest way is to lay them out, trace the curve of the wall onto them from underneath, and then cut them with a wet saw. The effort is well worth it for an impeccable result.
For any wall over three or four feet in height, you absolutely must consider geogrid reinforcement. Geogrid is a strong, flexible polymer mesh that gets laid horizontally within the wall and extends back into the hillside. It's placed on top of a course of blocks and then buried by the backfill. This effectively ties the wall to the earth behind it, dramatically increasing its strength and preventing it from bowing or failing. The specifications for geogrid placement depend on wall height and soil conditions, and it's a key component in our professional Seat Retaining Walls installations. Overlooking this for taller walls is a serious safety risk. The knowledge of when and how to build a curved retaining wall with geogrid is often what separates DIY from professional-grade construction.
Finally, think about how the wall integrates with the rest of your landscape. Does it frame a beautiful bed of plants? Does it create a level area for a new section of lush Artificial Turf SAN Diego? We often use low-voltage Landscape Lighting SAN Diego to wash up the face of a curved wall at night, highlighting its texture and shape. This transforms the wall from a daytime utility into a 24/7 feature. Ready to upgrade your backyard? Thinking about these integrations from the start is how you create a truly cohesive and breathtaking outdoor space.
Common Mistakes We See (And How to Avoid Them)
Over the years, our team has been called in to repair or replace more than a few failing walls. The mistakes are almost always the same, and they're almost always preventable. Here's what we've learned.
The number one culprit is an improper base. People rush the excavation, don't compact the gravel enough, or fail to get it perfectly level. The result? The wall settles unevenly, joints open up, and eventually, it starts to lean. A few extra hours spent on the base will save you from redoing the entire project in a few years. We mean this sincerely: the foundation is everything. The second biggest mistake in how to build a curved retaining wall is ignoring drainage. Building a wall without a proper drainage zone of clean stone and a perforated pipe is like building a dam with no spillway. Sooner or later, the pressure will be too much.
Another common issue is using the wrong blocks for the curve. If you try to build a tight curve with standard rectangular blocks without cutting them, you'll end up with huge, unsightly gaps at the back and weak points in the structure. Either use tapered blocks or commit to making the necessary cuts. Lastly, we see issues from improper backfilling. You must backfill and compact in lifts (layers of 6-8 inches at a time) as you build. Dumping all the backfill in at the end and trying to compact it from the top is ineffective. The soil at the bottom will remain loose, leading to settling and pressure on the wall. Avoiding these pitfalls is the essence of how to build a curved retaining wall that you can be proud of for years to come. It’s about patience and respecting the process.
Building a curved retaining wall is a deeply rewarding project. It’s a chance to permanently shape your landscape, adding both function and enduring beauty. While the process requires careful planning and physical effort, the result is a sophisticated feature that elevates your entire property. It's comprehensive. It's challenging. But it's absolutely doable. So take your time, follow the steps, and don't be afraid to ask for help if you get in over your head. Let’s Design the Outdoor Space You’ve Been Dreaming Of, and a beautiful curved wall could be the perfect place to start.


.webp)
.webp)