How to Build a Brick Patio | DIY Construction Guide for Laying Bricks Properly
While a project like this may seem overwhelming, breaking it down into simple steps makes it very achievable for a DIY weekend warrior. When you’re ready to learn how to build a brick patio, the materials are the first thing on your list.
Here are the essential materials you'll need:
Bricks: The star of the show! You'll need to measure your space to determine how many bricks you need. A good rule of thumb is to add about 5% extra to account for cuts and any broken bricks.
Paver Base: This is the foundation of your patio. You'll need several inches of crushed stone or gravel to create a stable, well-draining base. It's the most important part of your brick patio construction guide.
Leveling Sand: This is a layer of sand that goes on top of the paver base. You'll use it to create a smooth, level surface to lay your bricks on.
Geotextile Fabric: This fabric goes between the soil and the paver base. It helps to prevent weeds from growing up through the cracks and keeps the base materials from mixing with the soil.
Edging: Plastic or metal edging is essential to hold your bricks in place and keep the patio from shifting over time. You'll need stakes to secure it into the ground.
Joint Sand: Once all of your bricks are in place, you'll sweep a fine sand into the joints between them to lock everything together.
By gathering these materials, you are already well on your way to a beautiful new patio. The process of laying bricks for patio projects is much more fun when you have everything you need ready to go. While a DIY project can be very rewarding, sometimes you want the peace of mind that comes with a professional installation. Our Modern Yardz team are experts in creating beautiful outdoor spaces. We have a lot of experience with a variety of materials, including new patios with pavers. We can also install new fire features to make your space cozy and inviting. To talk to our team about your next project, please contact us today.
How Do I Plan the Layout for a Brick Patio Design?
The layout and design of your brick patio is where you get to be creative and make the space your own. A well-planned layout is the secret to a great-looking finished project. There are many different patterns you can choose from, and each one will give your patio a different feel. Planning the layout is an essential step in any brick patio construction guide. Before you even start laying bricks for patio projects, you should have a clear vision of what you want your finished project to look like.
Here are some popular patterns you can choose from:
Running Bond: This is a classic pattern where bricks are laid side by side in a straight line, with the joints staggered from row to row. It’s a simple, clean look that is perfect for a modern space.
Herringbone: This pattern is created by laying bricks in a zigzag pattern at a 45-degree angle. It's a strong and durable pattern that gives your patio a sophisticated look.
Basket Weave: This pattern is made by laying pairs of bricks side by side in alternating directions. It creates a woven effect that is perfect for a traditional or cozy space.
To plan your layout, you should first draw a simple plan on a piece of graph paper. This will help you visualize the pattern and how it will fit into your space. It's also a good idea to lay out a few bricks on the ground to get a feel for the pattern before you start the real work. Having a plan will make the process of how to build a brick patio much easier and more enjoyable. While a DIY plan is a great start, a professional design can take your patio to the next level. Our Modern Yardz team can help you with a complete design for your backyard. We can create a stunning patio design that complements the rest of your home. You can see some of our finished projects in our design portfolio. To get started on a new project for your home, please contact us today.
How Should I Prepare the Ground Before Laying Bricks?
The foundation of your brick patio is the most important part of the entire project. If you don't prepare the ground properly, your patio will shift, crack, and become uneven over time. Think of it this way: a beautiful finish can’t hide a shoddy foundation. This is the part of the project where you need to take your time and do it right. This guide will walk you through the proper way to prepare the ground before you start laying bricks for patio projects.
Here is a step-by-step guide to ground preparation:
Mark the Area and Excavate: Use stakes and string to mark the perimeter of your patio. Then, you will need to dig out the area to a depth of about 6-8 inches. This will allow enough room for the paver base, sand, and your bricks.
Install Edging: Once the area is excavated, you should install your edging around the perimeter. This will create a border to hold the bricks in place and keep them from shifting.
Lay Geotextile Fabric: Next, you will lay the geotextile fabric over the entire area. This fabric is important because it will keep the base materials from mixing with the soil and prevent weeds from growing.
Add and Compact the Paver Base: You can now add your paver base material to the excavated area. You should add it in layers, and you should compact each layer with a plate compactor. A well-compacted base is the secret to a long-lasting patio.
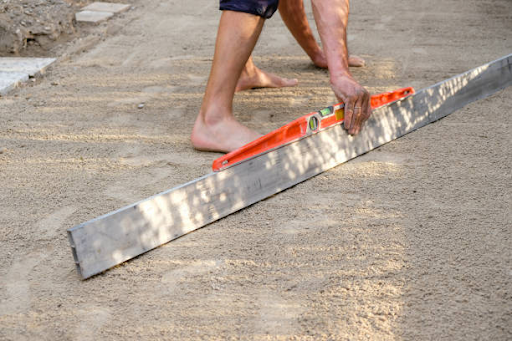
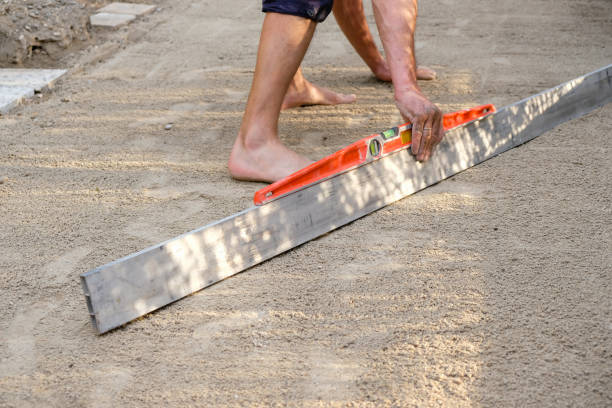
Screed the Sand: Finally, you will add a layer of leveling sand on top of the paver base. You should use a long, straight board to screed or level the sand so it is perfectly smooth.
Taking the time to do this part right will make the rest of the project much easier and will give you a patio that you can enjoy for years. While a DIY project is a great way to save money and feel a sense of accomplishment, our Modern Yardz team can handle the entire build process for you. We have the tools and expertise to make sure your new patio is installed perfectly. Our team also offers flexible finance options to help you with your new project. To talk to a member of our team about your next project and for more information on how to build a brick patio, please contact us today.
What Is the Correct Way to Lay Bricks for a Patio?
Now that you've prepared the ground and have a solid base, it's time for the most exciting part of the project: laying bricks for patio projects. This is where your hard work really starts to pay off. The key to a great-looking and long-lasting patio is to lay the bricks correctly and carefully, making sure everything is level and your pattern is consistent. A precise and steady hand is all you need to get a great result. Following a good brick patio construction guide like this one will help you get a great result.
Here are the key steps for laying the bricks:
Start in a Corner: Always begin your project in a corner, working your way outward from the house or a fixed object. This will help you keep your pattern aligned and your rows straight. Use a string line to guide your work and make sure each row is perfectly straight.
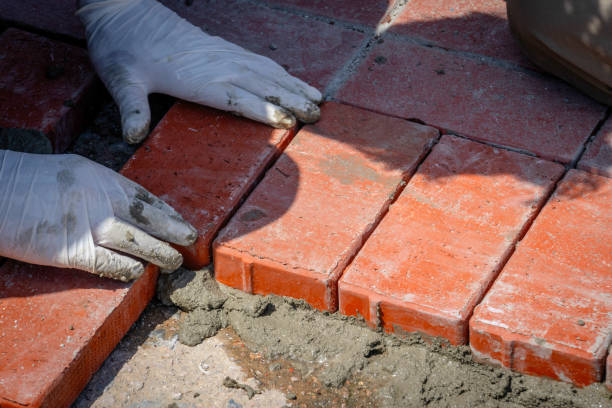
Lay Bricks on the Sand: Carefully place each brick on the sand, pressing it down gently but firmly. Avoid shifting the bricks around once they are in place. You want to make sure the sand bed remains smooth and level.
Tap Each Brick with a Mallet: Use a rubber mallet to gently tap each brick into place. This will help settle it into the sand bed and make sure it is level with the surrounding bricks. A light tap is all you need to get the job done right.
Check for Leveling: You should check for level every few bricks. Use a long level to make sure the entire row is level, and use a small one to check each individual brick. This will help you make sure your patio is perfectly flat.
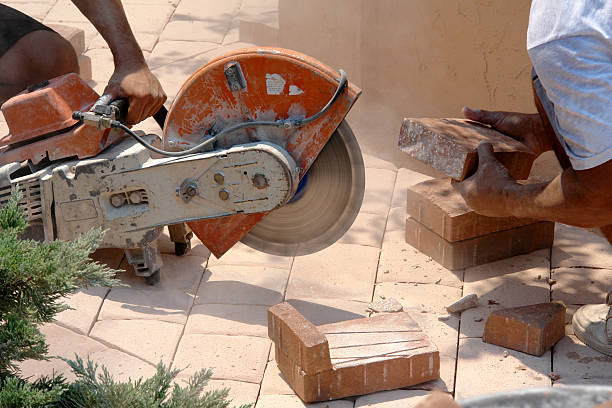
As you get closer to the edges, you will need to make cuts. This is a crucial step in a DIY project, but it's where many people get intimidated. For this, you will need a wet saw to make precise cuts. Once all of the full bricks are in place, you can measure and cut the edge pieces to complete your pattern. This part of the process is an important step when learning how to build a brick patio. If you’re feeling a bit overwhelmed by this part of the project, our Modern Yardz team can handle it for you. We can install a new patio with concrete or a new seat retaining wall for you. To talk to a member of our team about your next project, please contact us today.
Should I Use Sand or Mortar Between the Bricks?
This is a very common question, and it's an important one that you need to answer when you're planning a new brick patio. The choice between using sand or mortar between the bricks has a big impact on the finished product, its durability, and its maintenance. For most homeowners and DIY projects, sand is the best option for laying bricks for patio surfaces. It’s also the most common option.
Sand is a great choice because it's flexible. A patio with sand joints can shift and settle over time without cracking. This is a big advantage, especially in areas with a lot of ground movement or freeze-thaw cycles. Using a specialized material called polymeric sand is an even better option. Polymeric sand is a mixture of sand and a polymer binder that hardens when you add water. This creates a very strong and durable joint that resists weeds, insects, and erosion. It’s still flexible, so it will not crack, but it is much more durable than regular sand. This is the material that our Modern Yardz team uses in our projects. A polymeric sand joint is an easy-to-use option for your brick patio construction guide.
On the other hand, mortar creates a permanent, solid joint that is not flexible. A patio with mortar joints is very durable and can withstand a lot of wear and tear. However, it requires a lot more skill to install correctly. If the ground shifts, or if the base isn't prepared perfectly, a mortar joint can crack and be very difficult to repair. A mortar joint is also not as good for drainage because water can pool on the surface. We can help you with a complete landscape design to make sure your new patio is installed correctly and drains properly. We can also install new patios with pavers that have sand joints that are flexible and will not crack. To learn more about how to build a brick patio, please contact us today.
How Do I Maintain a Brick Patio After It’s Built?
Congratulations, you have a brand-new brick patio! The work isn't quite over, though. A little bit of maintenance goes a long way in keeping your patio looking great for years to come. Your new patio, even after laying bricks for patio surfaces and filling the joints with sand, will need some simple care to keep it in tip-top shape. Regular maintenance is a simple part of any brick patio construction guide and it will help you enjoy your new space for a long time.
Here are some tips for maintaining your new patio:
Sweep Regularly: Regularly sweeping your patio with a broom will help keep it clean and prevent debris from building up in the joints. This will also help keep weeds from sprouting and growing in the cracks.
Re-sand the Joints: The sand in the joints can erode over time due to weather and foot traffic. Every couple of years, you may need to add more sand to the joints to keep them full and stable. This is a very easy process that you can do on a weekend.
Remove Weeds: Even with polymeric sand, some persistent weeds may still find a way to grow. It's important to pull them out as soon as you see them to prevent them from taking over the patio.
Clean Spills Right Away: If you spill something on your patio, it's best to clean it up as soon as possible. A simple cleaning with soap and water is often enough to remove most stains.
Following these simple steps will help you keep your patio looking great for years. While a DIY project is a great way to save money and feel a sense of accomplishment, our Modern Yardz team can handle the entire process from start to finish. We have a variety of services to help you create an outdoor space that is beautiful and easy to maintain. We can install new artificial turf to help you with your lawn maintenance. You can see some of our finished projects in our build portfolio. To talk to a member of our team about how to build a brick patio or other projects, please contact us today.
Frequently Asked Questions. Here are some common questions. Find the answers you're looking for below.
What are the essential steps to learn how to build a brick patio properly?
Modern Yardz outlines that the key to learning how to build a brick patio starts with proper planning, preparing the base, and following a brick patio construction guide carefully. Laying bricks for patio evenly and securely ensures durability and a professional look.
How important is base preparation in brick patio construction guide for long-lasting results?
Modern Yardz stresses that base preparation is critical in any brick patio construction guide. A well-compacted and leveled base prevents shifting and settling, which is essential when laying bricks for patio projects to last for years.
What tools and materials do I need when laying bricks for patio in a DIY project?
According to Modern Yardz, you’ll need a shovel, tamper, level, rubber mallet, string line, and quality bricks. Using these tools properly as part of a brick patio construction guide will help you build a patio that lasts.
Can I follow the same brick patio construction guide for different brick patterns?
Yes, Modern Yardz explains that while brick patterns may vary, the fundamental steps in how to build a brick patio remain the same. Proper laying bricks for patio techniques apply to patterns like herringbone, basket weave, or running bond.
How long does it typically take to build a brick patio following a brick patio construction guide?
Modern Yardz estimates that small to medium patios can take anywhere from a few days to a week, depending on size and complexity when laying bricks for patio projects.
What common mistakes should I avoid when laying bricks for patio in my DIY build?
Modern Yardz advises against skipping base preparation, uneven brick placement, and failing to use proper spacing. These errors compromise the patio’s stability and appearance.
How do weather conditions affect brick patio construction guide and laying bricks for patio?
Modern Yardz highlights that dry, mild weather is ideal. Rain or freezing temperatures can hinder base setting and brick adhesion during your project.
Are there specific bricks recommended for brick patio construction guide to ensure durability?
Modern Yardz recommends using clay or concrete bricks designed for outdoor use, as these materials withstand weather and wear better when laying bricks for patio.
Can I install a brick patio myself, or should I hire professionals for brick patio construction guide?
While Modern Yardz supports DIY efforts, they caution that complex designs or large patios may require professional skills to ensure proper laying bricks for patio and longevity.
How do I maintain my patio after completing the brick patio construction guide and laying bricks for patio?
Modern Yardz suggests regular cleaning, sealing the bricks annually, and promptly addressing any shifting bricks to keep your patio looking great and lasting for years.
What is the best way to choose the right pattern when building a brick patio?
Consider the style of your home and the patio’s use. Popular patterns include herringbone for durability and running bond for a classic look.
How much does it typically cost to build a brick patio yourself?
Costs vary based on materials and size but expect to pay for bricks, base materials, and tools, with DIY labor saving money compared to hiring pros.
Can I build a brick patio on uneven ground?
Uneven ground requires extra base preparation, including leveling and compacting, to ensure stability before laying bricks.
How thick should the base layer be when building a brick patio?
A base layer typically ranges from 4 to 6 inches of compacted gravel or sand to support the bricks and prevent sinking.
What are signs that my brick patio needs repair or relaying?
Look for uneven bricks, cracks, or gaps in joints—these indicate shifting or wear that might require maintenance.


.webp)
.webp)