How Do You Lay Pavers in Dirt | Simple DIY Guide to Installing Pavers on Soil
While it might seem like a shortcut, laying pavers directly on soil will lead to a patio or walkway that becomes uneven and unstable over time. Soil naturally expands and contracts with changes in moisture and temperature. This movement causes the pavers to shift, sink, and become unlevel. Instead of a beautiful, smooth surface, you will end up with a bumpy and wobbly mess. The goal of a proper paver installation is to create a solid, stable foundation that will support the pavers for many years. Laying pavers directly on dirt just does not provide that stability. This is why professionals always prepare the ground with a proper base.
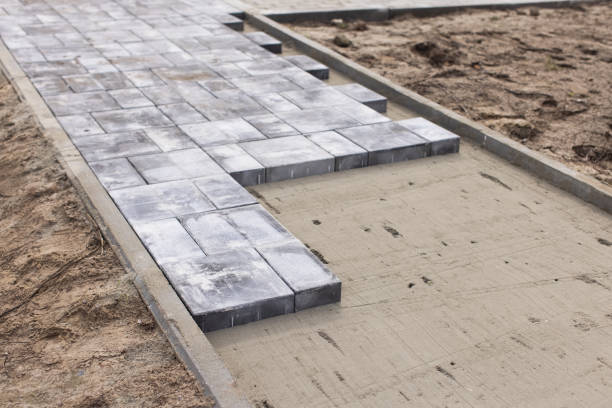
The correct way to prepare the base for installing pavers on dirt involves more than just putting down a layer of sand. A solid foundation is built up in a few different layers. First, a layer of crushed gravel or road base is laid down and compacted. This layer provides the main structural support and helps with drainage. The thickness of this layer can vary depending on your specific project, but a good rule of thumb is at least four to six inches. After the gravel is compacted, a layer of bedding sand is added. This sand is what the pavers actually rest on. The sand layer is crucial for several reasons:
It helps to create a perfectly level surface for the pavers.
It allows for minor adjustments during the installation.
It provides a flexible cushion that helps prevent the pavers from cracking.
Without this crucial sand layer, it would be almost impossible to get a perfectly flat and even surface for your patio or walkway. Trying to figure out how do you lay pavers in dirt the right way can be a little intimidating, but taking the time to do it correctly will save you a lot of headaches in the future.
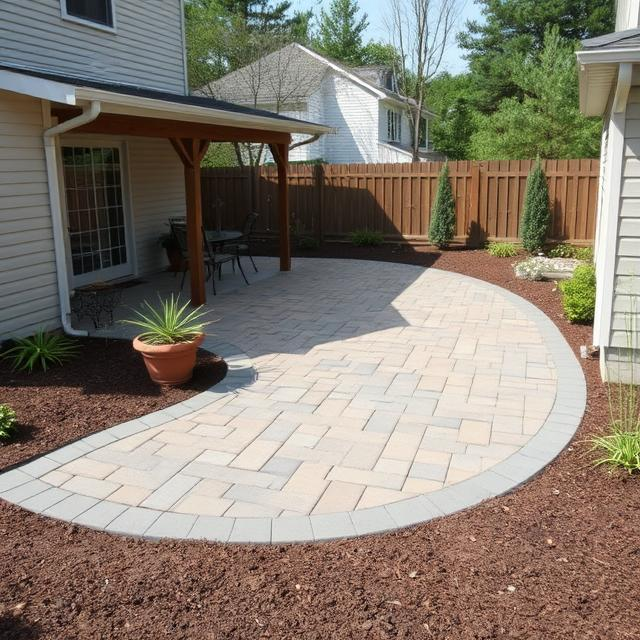
When you see a stunning, professionally installed paver patio, you are really seeing the quality of the base underneath. The pavers on top are just the finished surface. A proper base is what makes that patio last for decades without shifting or settling. At Modern Yardz, we know the importance of a strong foundation. We take the time and care to prepare the ground properly for every paver project we install. This includes excavating the soil, laying down and compacting a road base, and using the right kind of bedding sand. Our methods ensure that your paver patio or walkway will be stable and beautiful for years to come. If you have been searching for information on how do you lay pavers in dirt, we have a ton of information on our site about our expert services. Don't risk a bumpy, uneven patio in the future. Contact us today for a free quote on a professionally installed paver patio that will last for years. Check out our paver services page to see how we can handle every step of the installation for you. If a paver patio sounds too permanent, we can also design and build a beautiful concrete patio for your home. We can even help you find the right financing for your project.
What Tools Do I Need to Lay Pavers in Soil?
Getting the right tools is the first step to success when you’re learning how to lay pavers in soil. While you might think you just need a shovel and a bucket, there are a few other key items that will make your project much easier and ensure a professional result. For a successful paver installation, you will need a specific set of tools:
A shovel and wheelbarrow for digging and moving materials.
A hand tamper or a plate compactor for creating a firm base.
A screed, which is a long, straight board, for leveling the bedding sand.
A level and a string line to check for grade and to keep your paver layout straight.
A rubber mallet to gently tap the pavers into place.
A paver edger to hold the pavers in place.
A broom and polymeric sand to fill the joints.
Compacting the soil and the gravel base is critical for creating a solid foundation. Without a properly compacted base, your pavers will settle and become uneven over time. So, a compactor is one tool you really can't skip if you want your paver patio to last. After you have a good base, you will use the screed to level the bedding sand, and the rubber mallet to set the pavers. The paver edger is essential for preventing shifting, and the polymeric sand locks everything into place and keeps weeds out. The process of installing pavers on dirt requires more than just the pavers themselves; it requires a specific set of tools for a quality result.
If you are a DIY homeowner and you want a professional-looking paver patio, you need the right tools and knowledge. Getting the right tools, and knowing how to use them, can make all the difference in the world. When you hire professionals like the team at Modern Yardz, you don’t have to worry about buying or renting all these tools or learning how to use them. Our crew comes to your project with all the necessary equipment, from excavators to plate compactors, to ensure your patio is installed correctly and efficiently. We handle the entire process of installing pavers on dirt, so you don't have to lift a finger. We also have a wide range of services, so we can help you with anything from a custom outdoor kitchen to a new fire feature. Our team is ready to help you with your project from start to finish. Check out our build portfolio to see the amazing work we have done for other homeowners. We're confident we can deliver the outdoor living space of your dreams. Instead of spending your weekends on a difficult DIY project, let our team handle the hard work. Contact us today for a free quote.
How Do I Level the Ground Before Installing Pavers?
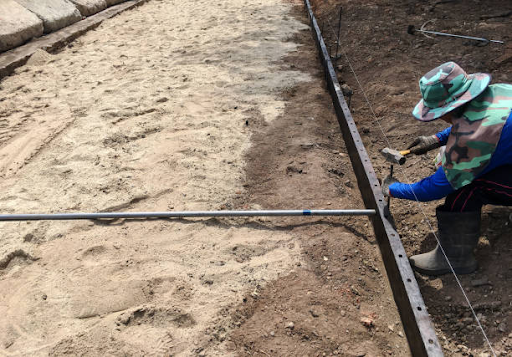
Leveling the ground before installing pavers is one of the most critical steps in the entire process. If the ground is not level, your patio will not be level, and it will be prone to shifting and sinking. The goal is to create a uniform and flat surface that will support your paver base. This step is also a good time to account for drainage. You do not want water to pool on your patio, so you should build a slight slope, or grade, away from your house. A good rule of thumb is to have a slope of about a quarter inch per foot. This will ensure that any rainwater drains off your patio and away from your home’s foundation. Laying pavers directly on soil without a proper grade can lead to serious drainage issues. The process for leveling the ground for a quality installation includes these steps:
Excavate the area: Dig down to a depth that will accommodate your gravel base, bedding sand, and the pavers. For most projects, this is about seven to eight inches.
Level the dirt: Use a string line and a line level to create a uniform and flat surface.
Compact the soil: Use a hand tamper or plate compactor to remove air pockets and create a firm, stable surface.
Add and compact gravel: Spread an even layer of gravel and compact it thoroughly.
Screed the sand: Use a screed to level the bedding sand to the perfect height for your pavers.
After the soil is compacted, you will add your layer of gravel base. You should spread the gravel evenly and then compact it as well. It is a lot of work, but it is what creates a professional-looking and long-lasting patio. The final layer is the bedding sand. You will use a screed to level this layer of sand to the perfect height, making it the final, perfectly flat surface for your pavers. Figuring out how do you lay pavers in dirt the right way can be a challenging process, but taking the time to properly level the ground and prepare the base is what makes all the difference. When you hire professionals at Modern Yardz, we take care of all these details for you. Our team has the equipment and expertise to ensure your ground is leveled and compacted to the highest standard. We handle every step of your project, from the initial landscape design to the final installation. Our team has built incredible patios for many homeowners, and you can see a lot of our completed work in our build portfolio. We also offer other great services like fire features and pools and spas. We can help you create the backyard of your dreams with a professional installation that will stand the test of time.
Don't let the hard work of leveling and compacting the ground stop you from getting the patio you deserve. Many of your neighbors are already enjoying their beautifully installed paver patios. Reach out to Modern Yardz for a free consultation and let us handle all the hard work of installing pavers on dirt for you.
Should I Use Landscape Fabric Under Pavers in Dirt?
When you’re thinking about laying pavers directly on soil, a question that comes up a lot is whether or not you should use landscape fabric. A lot of people think that laying landscape fabric will solve their weed problems and add stability to the project. While landscape fabric is a great tool for some landscaping tasks, it is generally not recommended for use directly under pavers. The primary reason people use it is to prevent weeds from growing up through the paver joints. However, a properly installed paver base and joint sand are much more effective at stopping weeds. The fine grains of the polymeric sand, which hardens when wet, create a solid barrier that weeds can’t easily penetrate. This is a much more reliable solution than a layer of fabric.
Using landscape fabric can actually create new problems for your paver project. The main issue is that it can trap moisture between the fabric and the soil below. This moisture can prevent proper drainage, which is one of the most important aspects of a long-lasting paver installation. If water gets trapped, it can cause the soil underneath to become soft and unstable, leading to your pavers sinking or shifting over time. Another problem with using fabric is that it can become a slick surface for the gravel base to sit on. If the base material shifts or moves, the fabric can act like a slip-and-slide, causing the entire patio to become uneven. So, while it seems like a simple solution for weed control, landscape fabric can actually compromise the long-term stability of your paver patio. The best way to prevent weeds and shifting is to focus on a high-quality, compacted base and proper joint sand. When you are asking yourself how do you lay pavers in dirt, the answer is always to build a stable foundation.
The right way to do it is to start with a layer of compacted road base, followed by a layer of bedding sand, and finally the pavers. This layered approach provides the necessary drainage and stability for your patio to last for decades. This method ensures that your paver patio will be strong and stable and that you won't have to deal with a lot of weed problems later. The goal when installing pavers on dirt is to create a permanent structure, not just a temporary one, and that starts with the base. If you are not sure about all the steps involved in a professional installation, you should consider hiring experts. At Modern Yardz, we know exactly what is needed for a long-lasting and beautiful paver patio. We follow a strict process to ensure every project is built to the highest standard. From the proper excavation to the final joint sand application, we take care of all the details. Check out our build portfolio to see the quality of our work. If you have been struggling with how do you lay pavers in dirt, don't worry. We can make the whole process simple for you.
Don't risk a bumpy, uneven patio in the future. Many homeowners are getting a professional, long-lasting paver patio that looks great for years. Contact us today for a free quote on a professionally installed paver patio that will last. Check out our paver services page to see how we can handle every step of the installation for you. If a paver patio sounds too permanent, we can also design and build a beautiful concrete patio for your home. We can even help you find the right financing for your project.
How Do I Keep Pavers From Shifting Over Time?
One of the biggest concerns for homeowners is how to keep pavers from shifting over time. No one wants to put in all that work only to have their beautiful new patio look bumpy and uneven after a year or two. The key to a stable paver patio lies in a few crucial steps that work together to lock everything in place. The first and most important element is the compacted base. A properly prepared base of crushed gravel or road base, compacted with a plate compactor, provides the strong and unyielding foundation your pavers need. This layer is what handles the load and prevents the entire patio from sinking into the ground.
Once you have a solid base, the next step is the paver edging. This is a plastic or metal border that is installed around the entire perimeter of the patio. It is secured to the ground with spikes and acts like a frame for your paver project, preventing the pavers on the edges from spreading out or shifting. Without a paver edge, the whole installation is at risk of falling apart over time. So, a good paver edge is essential for keeping everything in its place. The final piece of the puzzle is the joint sand. The best kind to use is polymeric sand. This sand is swept into the joints between the pavers and, once it is wet and dries, it hardens to lock the pavers together. This creates a solid surface that prevents any movement and also stops weeds from growing in the joints. For a truly long-lasting paver patio, you need to make sure you use a high-quality polymeric sand and follow the instructions carefully.
When you follow these steps, your paver patio will be a permanent and beautiful addition to your home. The combination of a compacted base, paver edging, and polymeric sand ensures that your pavers stay put for many years. It is all about creating a solid system where every part supports the others. This is the professional way of how do you lay pavers in dirt. If this sounds like a lot of work, it is. That's why many homeowners choose to hire professionals like the team at Modern Yardz. We have years of experience and are experts in installing pavers on dirt with a focus on durability and long-term stability. Our paver services are the best in the area, and we can handle everything for you. We can even help you with other amazing features like retaining walls or even a fire feature. We have a ton of photos of our work in our build portfolio.
Stop worrying about a shifting patio. Many of your neighbors are enjoying the peace of mind that comes with a professional paver installation that is built to last. Let the experts at Modern Yardz ensure your patio stays beautiful for years to come. Contact us today for a free quote and let our team get to work on your new outdoor space.
What’s the Easiest Way to Space Pavers Evenly on Dirt?
Getting the pavers spaced evenly is crucial for a great looking patio. Uneven spacing can make your project look sloppy and unprofessional, and it can also weaken the installation by not allowing the joint sand to do its job correctly. The easiest way to space pavers evenly on dirt is to use plastic paver spacers. These are small, cross-shaped pieces of plastic that are designed to sit between the pavers. You simply place them at the corners of each paver as you lay them down. The spacers ensure that every joint is the same width, which is important for the look of the patio and for the polymeric sand to fill the joints completely.
If you don't have paver spacers, you can also use small pieces of wood or even a small ruler to maintain a consistent gap. The important thing is to be consistent with the spacing across the entire project. When laying pavers, you should also be careful to not slide them into place. Instead, you should place them down gently, which helps to avoid disturbing the bedding sand underneath. As you are installing pavers on dirt, it's also a good idea to lay them in a specific pattern, like a running bond or a herringbone pattern. This not only looks good but also adds to the strength and stability of the patio.
For a DIYer, getting perfect, consistent spacing can be a challenge. It takes a lot of care and patience to make sure every paver is in the right place. This is where professional help can make a huge difference. When you hire experts like our team at Modern Yardz, you can be sure that your pavers will be laid perfectly, with every joint being exactly the right width. We handle every detail, from the initial landscape design to the final installation. We have a lot of experience laying different paver patterns and can create a truly stunning design for your yard. If you're tired of searching for how do you lay pavers in dirt, and you're ready to get started on your dream yard, don't wait. You can get a free quote from Modern Yardz for your project. We also offer other great services like paver installation in San Diego, so be sure to check out what we can do for you. Many homeowners are already enjoying their new yards thanks to our professional services. We can help you turn your backyard dreams into a reality.
Stop struggling with perfect spacing and uneven joints. Our team has the expertise to make your paver project look flawless, and we are just a call away. Contact Modern Yardz for a free consultation and let us handle the hard work of laying pavers on soil for you. We also create incredible pools and spas, so we can help you with a complete backyard transformation.
Frequently Asked Questions. Here are some common questions. Find the answers you're looking for below.
What is the best method for how do you lay pavers in dirt to ensure they stay level and stable?
Modern Yardz recommends starting by clearing and leveling the soil, then adding a compacted base layer of gravel or sand before laying pavers directly on soil. This preparation is key for installing pavers on dirt that lasts and prevents shifting.
Can I lay pavers directly on soil without a base, and what are the risks involved when laying pavers directly on soil or installing pavers on dirt?
Modern Yardz advises against laying pavers directly on soil without a proper base, as this often leads to uneven settling and instability. Proper base preparation is essential when installing pavers on dirt for a long-lasting surface.
How do I prepare the dirt before installing pavers on dirt to get the best results when laying pavers directly on soil?
Modern Yardz suggests removing grass and debris, leveling the area, and compacting the soil before laying pavers directly on soil. These steps ensure a solid foundation when installing pavers on dirt.
What tools and materials do I need for laying pavers directly on soil when installing pavers on dirt?
Modern Yardz recommends tools such as a shovel, tamper, level, and rubber mallet, plus materials like gravel, sand, and edging to secure the pavers properly when installing pavers on dirt.
How do I maintain proper drainage when how do you lay pavers in dirt or when laying pavers directly on soil?
Modern Yardz stresses grading the soil away from structures and using a permeable base to prevent water pooling and erosion when installing pavers on dirt.
Can laying pavers directly on soil cause shifting over time, and how do I prevent that when installing pavers on dirt or how do you lay pavers in dirt?
Modern Yardz explains that pavers can shift without a proper base. Compacting gravel and adding edging are important when how do you lay pavers in dirt to keep them stable.
How deep should I dig when installing pavers on dirt for a durable surface when laying pavers directly on soil?
Modern Yardz recommends digging 6 to 8 inches to allow for a gravel base, sand bedding, and the thickness of the pavers when installing pavers on dirt.
What pattern is best for laying pavers directly on soil when installing pavers on dirt?
Modern Yardz suggests simple patterns like running bond or basket weave, which are easier for DIYers and provide strength when laying pavers directly on soil.
Is it suitable for heavy foot traffic areas when how do you lay pavers in dirt or laying pavers directly on soil?
Yes, but Modern Yardz advises ensuring a well-compacted base and solid edging when installing pavers on dirt to handle heavier use.
How do I finish edges properly when laying pavers directly on soil to keep the patio intact while installing pavers on dirt?
Modern Yardz recommends installing sturdy edging like metal or plastic secured with stakes to maintain the paver layout when installing pavers on dirt.
How long does it take to complete how do you lay pavers in dirt for a small area?
Time varies but many DIYers finish small projects within a weekend.
Can I install pavers on dirt in wet or clay-heavy soil areas?
It’s possible but requires extra base preparation and drainage measures.
Is weed barrier fabric useful when laying pavers directly on soil?
Yes, it reduces weed growth and soil erosion.
How do temperature changes impact pavers installed on dirt?
Freeze-thaw cycles can cause movement; a solid base helps prevent this.
What are cost-saving tips for how do you lay pavers in dirt as a DIY project?
Sourcing affordable materials, renting tools, and good planning help keep costs down.


.webp)
.webp)