How to Install Synthetic Turf Grass: A Pro's Walkthrough
Your New Lawn Awaits: A Professional Look at How to Install Synthetic Turf Grass
Let’s be honest. The dream of a sprawling, impeccably green lawn is a core part of the Southern California lifestyle. But the reality? It’s often a relentless battle against sun-scorched patches, soaring water bills, and weekends lost to mowing, weeding, and fertilizing. It’s a significant, sometimes dramatic, drain on your time and resources. Our team at Modern Yardz has seen it countless times across San Diego County—homeowners who are simply tired of the fight but aren't willing to give up on having a beautiful outdoor space.
This is where the conversation about synthetic turf always begins. It’s not just “fake grass” anymore; it's a sophisticated landscaping solution that offers a pristine, low-maintenance alternative. Whether you're a determined DIYer ready to tackle a major project or a homeowner who wants to understand exactly what goes into a professional installation, you're in the right place. We've spent years perfecting our process, and we're pulling back the curtain to show you how it's done right. This isn't just a list of steps. It's our playbook, built from experience on real job sites from Chula Vista to Oceanside.
Before You Even Touch a Shovel: The Planning Phase
So many installation issues can be traced back to a failure in planning. Seriously. A rushed start is a guaranteed recipe for headaches and costly mistakes down the line. Our experience shows that a few extra hours spent here—measuring, selecting materials, and gathering tools—saves days of frustration later. This is the foundational blueprint for your entire project.
Measuring and Ordering: The First Critical Step
This seems simple, but it’s surprisingly easy to get wrong. You’re not just calculating square footage; you’re planning for roll widths and grain direction. Here's what we've learned—always measure your area, then draw a simple diagram. Artificial turf typically comes in 15-foot-wide rolls. Your goal is to lay out your turf pieces on your diagram in a way that minimizes seams and waste.
And—let's be honest—this is crucial. Always order about 10-15% more turf than your exact square footage. This accounts for waste from trimming edges, cutting around obstacles like trees or planters, and any potential mistakes. Running out of material mid-project is a catastrophic, momentum-killing error. Also, consider the grain or “pile direction.” Every blade of synthetic grass leans slightly in one direction. For the most natural look, you need every single piece of turf you install to have the grain running in the exact same direction. We recommend pointing the grain towards the primary viewing area, like your back patio or kitchen window, as this is typically the most aesthetically pleasing angle.
Choosing Your Turf: More Than Just Green Carpet
The market is flooded with options, and they are absolutely not created equal. The turf you choose will dictate the look, feel, and durability of your lawn for the next 15-20 years. Don't just pick the cheapest option. It's a classic case of getting what you pay for.
Here's what to look for:
Pile Height: This is the length of the grass blades. Shorter piles (around 1.25") are great for high-traffic zones and a manicured look. Longer piles (1.75" and up) offer a more lush, natural meadow feel but may require more frequent brushing to keep the blades upright.
Face Weight: This is the weight of the yarn per square yard (in ounces), not including the backing. A higher face weight means more density and a more durable, resilient product. For a San Diego yard that will see kids, pets, and parties, we never recommend going below a 50-ounce face weight.
Thatch: Look for turf with a curly, multi-colored thatch layer woven in at the base. This mimics the look of real grass and helps the blades stand up straight. A purely green turf often looks plasticky and fake.
Backing: The backing is what holds everything together. A high-quality, polyurethane-coated backing is far superior to latex. It's more durable, drains better, and doesn't expand and contract as much with temperature changes—a non-negotiable feature in our sunny climate.
Our team can help you navigate these choices, but the key is to match the turf to your lifestyle. A decorative side yard has very different needs than a backyard that doubles as a soccer pitch.
Gathering Your Arsenal: Tools and Materials
A professional result demands professional-grade (or at least the right) tools. Scrambling to find what you need in the middle of a step is a surefire way to compromise quality. Here's a comprehensive list of what you'll need:
Shovels, rakes, and a wheelbarrow
Sod cutter (you can rent one—it's worth every penny)
Measuring tape and chalk line
Hand tamper and a plate compactor (another rental essential)
2x4 or screed board for leveling the base
Heavy-duty landscape fabric
Sub-base material (we'll cover this next)
Bender board or other edging material
Turf adhesive and seam tape
A high-quality carpet knife with plenty of extra blades
6-inch, non-galvanized landscape staples or nails
A drop spreader for the infill
A power broom (the ultimate finishing tool, also rentable)
Here’s a quick comparison of the most common sub-base materials we use in our Services projects:
Material
Best For
Pros
Cons
Class II Road Base
All-purpose applications
Excellent compaction, fantastic drainage, industry standard.
Can be heavy and difficult to move and grade by hand.
Decomposed Granite (DG)
Areas needing a firm surface
Compacts to a very hard, smooth finish. Great for stability.
Can be less permeable than road base if not installed correctly.
Crushed Miscellaneous Base (CMB)
Budget-conscious projects
Often made from recycled concrete/asphalt, making it affordable.
Quality and consistency can vary wildly between suppliers.
We almost always lean toward Class II Road Base for its reliability and superior drainage properties, which is vital for preventing pooling water.
The Foundation of Success: Site Preparation
This is where the real work begins. The performance and longevity of your synthetic turf lawn are almost entirely dependent on the quality of the base underneath it. Skimp here, and you'll be looking at dips, bumps, and drainage problems for years to come. We can't stress this enough—a perfect base is everything.
Demolition Day: Removing the Old Lawn
First, you need to excavate the existing lawn, soil, and any roots. For a proper installation, our team excavates to a depth of 4 to 6 inches. Yes, that's a lot of dirt. A sod cutter will make removing the grass layer itself much easier, but the rest will likely be manual labor with shovels and a wheelbarrow. It's grueling work, but it's the only way to ensure you have enough room for a robust, stable base that won't settle over time.
Rough Grading and Drainage Considerations
Once the area is cleared, it's time to think about drainage. This is one of the most overlooked steps by DIYers. You need to create a slight, almost imperceptible slope—we aim for a 1-2% grade—that directs water away from your home's foundation, patios, and walkways. In areas with poor-draining soil like the clay common in many San Diego neighborhoods, this step is absolutely critical. We've seen some catastrophic pooling issues on jobs where this was ignored. After grading, we often lay down a layer of high-quality, permeable landscape fabric to prevent weed growth from below.
Installing the Bender Board or Edging
Before you bring in any base material, you need to frame your turf area. Installing a bender board or other landscape edging creates a clean, defined border and, more importantly, acts as a retaining edge to hold your sub-base material in place. Secure it firmly with stakes. This small detail is what gives an installation that sharp, professional look and prevents the edges from crumbling or shifting over time.
Building the Unyielding Base Layer
With your site prepped, it's time to build the foundation. This multi-step process creates the firm, level, and porous bed your turf will call home.
Laying Down Your Sub-Base Material
Bring in your chosen sub-base material—likely Class II Road Base—using a wheelbarrow. Spread it evenly throughout the excavated area, aiming for a consistent depth of about 3 to 5 inches. Use a rake to get it relatively level, but don't obsess over perfection just yet. At this stage, you're just getting the bulk of the material in place.
How to Install Fake Grass with DaznDi (Steps to Install Fake Grass)
This video provides valuable insights into how to install synthetic turf grass, covering key concepts and practical tips that complement the information in this guide. The visual demonstration helps clarify complex topics and gives you a real-world perspective on implementation.
Compacting for Perfection: The Plate Compactor
This is a non-negotiable, game-changing step. You must use a mechanical plate compactor to compact the sub-base. A hand tamper simply won't cut it. Your goal is to achieve 90-95% compaction. You'll want to wet the base material slightly (this helps with compaction) and then run the plate compactor over the entire area multiple times in different directions. A properly compacted base feels as solid as concrete underfoot. Skipping this will inevitably lead to depressions and an uneven lawn as the base settles unevenly over time. It’s the difference between a lawn that looks great for a year and one that looks great for a decade.
The Final Smoothing: The Top Layer
After the main base is compacted, we add a final, thin layer (about half an inch) of a finer material like decomposed granite. This isn't for structure; it's for creating a perfectly smooth surface to lay the turf on. We then use a long 2x4 or a screed board, resting it on the edging on either side of the area, and pull it across the surface to shave off high spots and fill in low spots. The result should be a perfectly flat, smooth plane. Take your time here. Any imperfections in this final layer will be visible once the turf is down.
Rolling Out the Green: Laying and Seaming the Turf
Now for the exciting part—seeing your yard turn green. This phase requires precision and patience, especially when it comes to the seams.
The Big Roll-Out: Positioning Your Turf
Carefully roll your turf out over the prepared base according to the plan you drew earlier. Let it sit in the sun for at least an hour or two. This helps the turf relax and allows the backing to become more pliable after being tightly rolled for shipping. Remember what we said about grain direction? Double-check that all your pieces are running the same way. It's a small detail that makes a world of difference.
Making the Cuts: Trimming to Fit
Once the turf is in position, it's time to make your cuts. Always, always cut from the back side of the turf using a sharp carpet knife. This allows you to cut the backing without shearing off the grass blades, which helps create invisible seams. Change your blade frequently—a dull blade will tear the backing and make clean cuts impossible. When trimming along the perimeter, press the turf firmly against your bender board or hardscape edge and cut carefully for a snug fit.
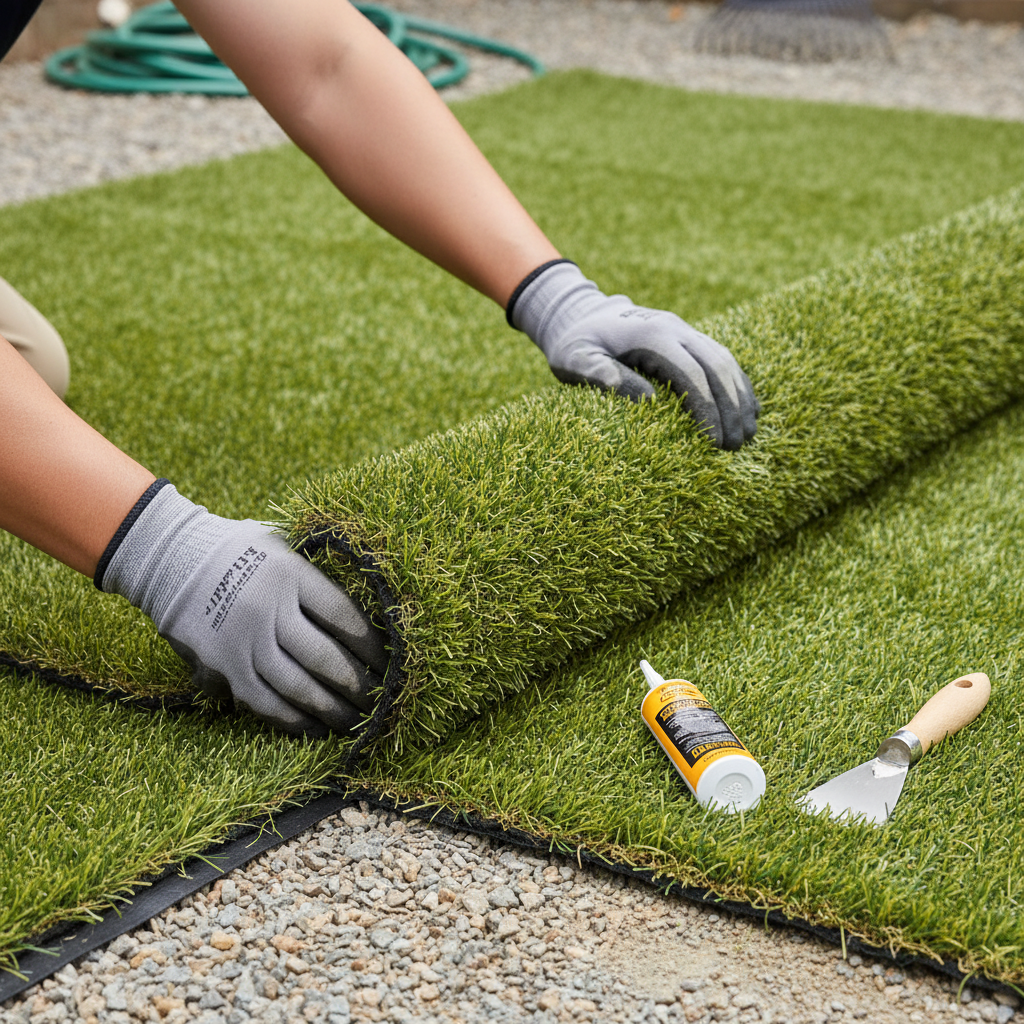
The Art of the Invisible Seam
Seaming is the true test of an installer's skill. A bad seam will stick out like a sore thumb for the life of the lawn. Here's the professional process we follow at Modern Yardz:
Prep the Edges: When you get a roll of turf, there's often a stitch line or selvedge edge from the manufacturing process. You need to trim this off—usually about 2-3 stitch rows in—to get to the solid part of the turf for a tight seam.
Positioning: Lay your two pieces of turf next to each other, ensuring the grain is matched perfectly. The goal is to have the edges just touching, not overlapping and not with a gap. The spacing between the stitch rows on either side of the seam should match the natural spacing of the rows within the turf itself.
Fold and Tape: Carefully fold back the edges of both pieces of turf. Roll out your seam tape (sticky side up if you're using self-adhesive, or non-sticky side up if you're using glue) down the center of the seam line on the sub-base.
Apply Adhesive: If using glue, apply it to the seam tape in a wide S-pattern. Don't use too much, or it will ooze up through the turf and harden the fibers.
Marry the Pieces: This is the critical moment. Slowly and carefully, fold one side of the turf onto the adhesive-covered tape, then the other. Press down firmly along the entire length of the seam. Avoid sliding the turf, which can cause blades to get trapped in the glue.
After the seam is set, we avoid heavy traffic on it for several hours to allow the adhesive to cure properly.
The Finishing Touches That Make All the Difference
You're almost there. These final steps are what secure the turf, give it weight and resilience, and make the blades stand up for that lush, just-mowed appearance.
Securing the Perimeter
With everything cut and seamed, it's time to nail it all down. Using 6-inch, non-galvanized landscape staples or nails, secure the entire perimeter of the turf. Place a nail every 4 to 6 inches, driving them down through the turf and into the sub-base. The trick here is to separate the grass blades before you hammer the nail so the head doesn't crush the fibers. A properly installed nail should be completely invisible.
Applying the Infill: Weight, Ballast, and Bounce
Infill is the unsung hero of every artificial grass installation. It's a granular material (usually a type of sand) that you spread over the top of the turf. It serves several critical functions: it adds weight to hold the turf in place, it protects the backing from UV rays, it helps the blades stand upright, and it provides ballast and a more natural feel underfoot. It is not optional.
We use a broadcast or drop spreader to apply the infill evenly, typically at a rate of 1 to 2 pounds per square foot. For homes with pets, we strongly recommend using a specialized infill with antimicrobial properties, like zeolite, which helps trap and neutralize the ammonia from pet urine, significantly reducing odors.
Power Brushing for a Flawless Finish
The final step is to brush everything in. A simple rake won't do. A power broom—a motorized rotary brush—is the only tool for the job. You'll run it against the grain of the turf. This action forces the infill down into the base of the fibers while simultaneously pulling the grass blades up, giving the lawn a full, vibrant, and uniform appearance. It's the step that truly brings the entire installation to life.
Why Sometimes Calling a Pro is the Smartest Move
We've laid out the entire process, and as you can see, it's a formidable undertaking. It involves heavy machinery, back-breaking labor, and a level of precision that comes from experience. Honestly, though, for many homeowners, the investment in a professional installation is well worth it. When you work with a team like ours, you're not just getting a new lawn; you're getting peace of mind.
You're getting the assurance that the drainage is engineered correctly, the seams will be invisible, and the base will be unyielding for years to come. If you're intrigued by the idea of a perfect lawn without the weekend-destroying labor of a DIY project, we'd love to talk. You can learn more About our design and build philosophy or reach out to our team directly to get a quote. Let us handle the hard work, so you can just enjoy your beautiful new outdoor space.
An artificial turf installation is more than just a home improvement project; it's a lifestyle upgrade. It's about reclaiming your weekends, conserving a precious resource, and creating a stunning, functional landscape that your family can enjoy year-round. Whether you tackle it yourself or bring in the experts, the result is a perfect green lawn that's always ready for life's best moments. If you have any questions or are ready to transform your yard, please don't hesitate to Contact us. We're here to help bring your vision to life, right here on our beautiful Home turf in San Diego.
Frequently Asked Questions. Here are some common questions. Find the answers you're looking for below.
How long does synthetic turf actually last?
A high-quality synthetic turf, when professionally installed, can last 15 to 20 years or even longer. The lifespan depends on the quality of the materials, the amount of foot traffic it receives, and exposure to the elements.
Is artificial grass safe for pets and children?
Absolutely. Modern synthetic turf is made from non-toxic materials and is completely safe for both kids and pets. We recommend choosing a turf with a durable backing and using a specialized pet-friendly infill to help manage odors.
How do you clean artificial turf?
For general cleaning, you can simply rinse it with a hose to remove dust and pollen. For solid pet waste, remove it as you would on normal grass and then rinse the area. For stubborn spots, a mild detergent and a soft brush will do the trick.
Does artificial turf get hot in the San Diego sun?
Yes, synthetic turf can get warmer than natural grass in direct sunlight. However, choosing a lighter-colored turf and using certain types of infill can help mitigate heat. A quick spray with a hose can also cool it down instantly.
What is the average cost to install synthetic turf?
The cost can vary widely based on the quality of the turf, the size of the area, and the amount of site preparation required. While the upfront investment is higher than sod, the long-term savings on water and maintenance are significant.
Can I install artificial turf directly over concrete?
Yes, you can install turf over concrete, but the process is different. It typically involves laying down a shock-absorbent padding first to provide cushioning and ensure proper drainage, then gluing the turf directly to the pad.
What kind of maintenance does artificial grass really need?
It's very low-maintenance, not no-maintenance. We recommend occasional rinsing to keep it clean and cross-brushing high-traffic areas with a stiff broom a few times a year to keep the blades standing tall.
How critical is the sub-base for a turf installation?
The sub-base is the single most important part of the entire installation. A properly compacted and graded base prevents dips, ensures proper drainage, and provides the stable foundation your turf needs to last for decades.
What is the best infill to use if I have dogs?
Our team strongly recommends using a zeolite-based infill for pet owners. Zeolite is a natural mineral that traps and neutralizes the ammonia in pet urine, which is the primary source of odor.
Why is the turf's grain direction so important?
Having all turf sections run in the same grain direction is crucial for a uniform, natural appearance. If the grains run in different directions, the seams will be obvious due to the way light reflects off the blades.
Can weeds still grow through synthetic turf?
It's very rare for weeds to grow through the middle of a properly installed turf with a quality weed barrier. You may occasionally see a weed pop up around the edges, but they are typically easy to remove.
How well does artificial turf drain water?
Modern synthetic turf has a perforated backing designed for excellent drainage. When combined with a properly prepared and compacted sub-base, a synthetic lawn can drain water even more efficiently than natural grass.


.webp)
.webp)