Homeowners: Cut 10–15% Waste with Patio Paver Patterns, Design Build
Pattern-first patio planning that pairs design ideas with builder-grade installation. Learn which paver patterns suit your size, material, and true waste...
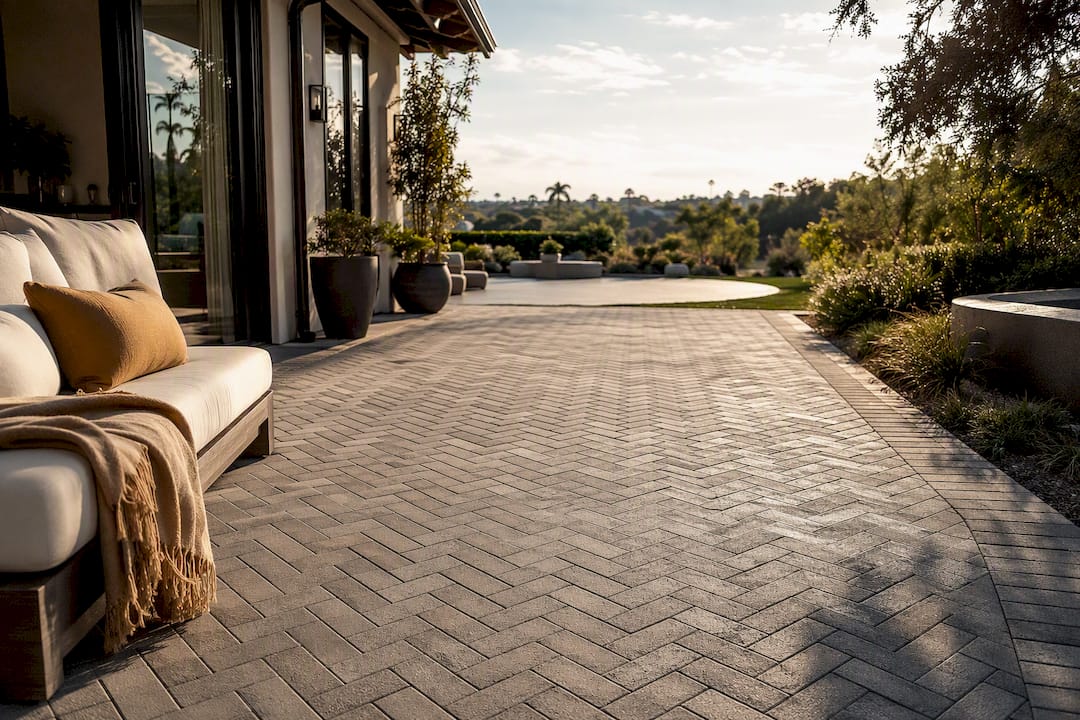
For most patios, herringbone delivers the strongest interlock and the longest service life under furniture and foot traffic, running bond gives you a clean modern look with the least cutting, and ashlar or large-format layouts create the plane-like, contemporary surface that high-end outdoor rooms are built around. The tradeoff is consistent across all of them: more visual complexity means more cut pavers, more waste, and a tighter installation tolerance. Everything below walks through which pattern fits which patio, and what it actually takes to build it right.
TL;DR: - Herringbone is ideal for high-traffic patios and vehicle loads, with waste around 8 to 12 percent due to edge cuts, especially at irregular footprints. - Running bond offers low waste between 3 to 5 percent and is best for straightforward, modern patios where the pattern remains the visual focus. - Pattern complexity affects installation, with intricate layouts like ashlar and circular designs requiring higher base depths, careful layout, and precise cutting. - Material choice must match the pattern: natural stone and travertine suit ashlar and modular layouts, while concrete handles most patterns except circular or European fan types. - Proper installation sequencing, including base depth, bedding, edge restraints, and joint filling, is critical to ensure pattern longevity and structural performance.
Table of Contents
- What Are the Best Paver Patterns for Patios?
- Detailed Pattern Profiles: Look, Cost, and Cutting Complexity
- How to Choose a Pattern by Patio Size and Layout
- What Complex Patterns Change About Installation
- Matching Materials to Your Pattern
- Keeping a Patterned Patio Looking Sharp
- Borders, Insets, and Keeping Multiple Patterns Cohesive
- A Design-Build Perspective on Pattern and Precision
- Why Pattern Choice Deserves the Same Weight as Material Choice
- Let Modern Yardz Design Your Patio Pattern Right the First Time
- Sources
What Are the Best Paver Patterns for Patios?
Picking among paver patterns for patios really comes down to three questions: how much visual movement do you want, how much cutting are you willing to pay for, and will the surface ever carry a vehicle. Here's how the most common patterns stack up.
- Herringbone (45° or 90°) — Best for high-traffic patios, pool decks, and any surface that might see a golf cart or service vehicle. The interlocking geometry resists lateral shift better than any other layout. Waste typically runs 8 to 12% because of the edge cuts required to close out a rectangular field.
- Running bond — Best for a straightforward, modern rectangular patio where you want the paver itself, not the pattern, to be the visual statement. Waste is typically low since courses run in straight, uncut lines except at borders.
- Basket weave — Best for traditional or period-style homes, especially with brick or clay pavers. The paired-block rhythm reads formal and orderly. Waste sits around 5 to 8%.
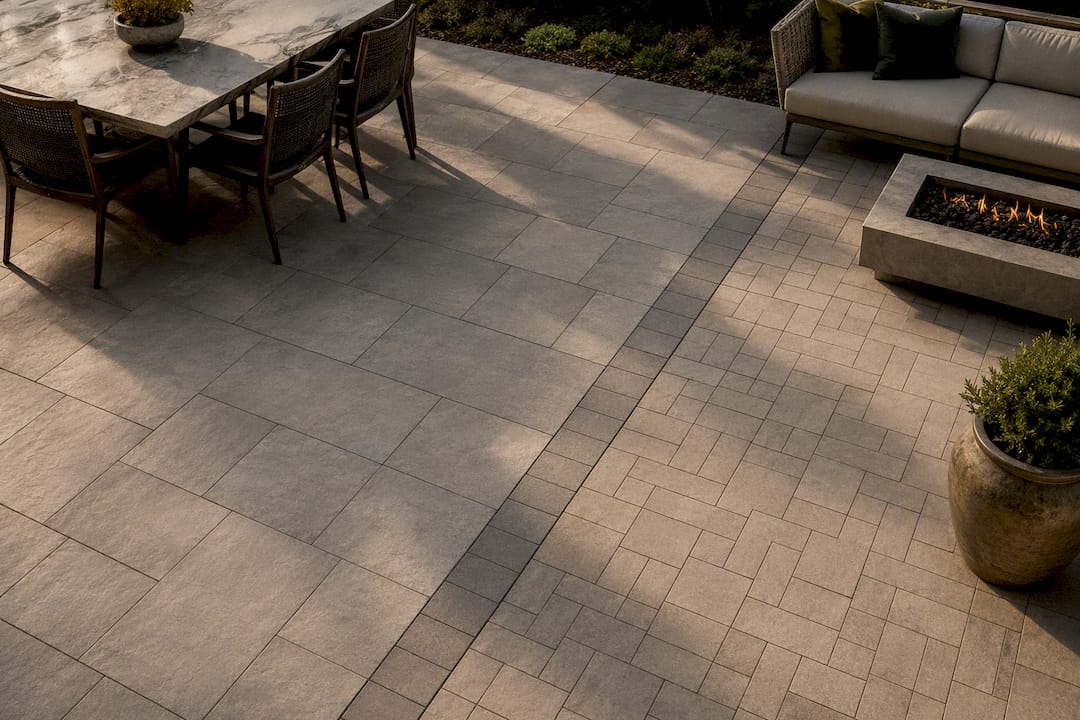
- Ashlar / modular — Best for larger, upscale terraces where a mix of paver sizes creates a custom, tailored look without a repeating grid. Waste ranges widely, often 8 to 15%, because the randomized module mix requires careful layout planning.
- Circular / fan pattern — Best as a focal-point inset around a fire feature or fountain, not for an entire patio. Waste is the highest of any layout, frequently 15 to 20%, since every ring paver is a custom cut.
- Stack bond / jack-on-jack — Best for a minimalist, grid-forward aesthetic with large-format concrete or porcelain units. Waste is low, but any misalignment in the base shows immediately since there's no pattern to disguise it.
- Pinwheel — Best for adding texture to a running bond field, often used as a border or transition band rather than a full field pattern. Waste runs 6 to 10%.
- Cobblestone / European fan — Best for a European courtyard look, often in tumbled concrete or reclaimed granite. Waste is high because of the irregular unit shapes.
- Large-format slab (grid or offset) — Best for a contemporary plane, especially in porcelain or natural stone, where tight joints and minimal grout lines are the goal. Waste is generally low, though slab breakage during handling can increase losses on complex sites.
For any of these, standard paver projects should budget roughly 5% extra material for waste, with intricate patterns or heavy curves pushing that to 10 to 15%. None of the circular or European-fan layouts are appropriate for vehicular loading. Herringbone remains the only pattern on this list routinely specified where light vehicle traffic is expected.
Detailed Pattern Profiles: Look, Cost, and Cutting Complexity
The numbered list above tells you which pattern to shortlist. This section tells you what each one actually looks like on the ground, what it costs in labor, and which materials suit it.
Herringbone
Herringbone reads as constant diagonal or perpendicular movement, which is exactly why it performs so well structurally. Every unit locks against four neighbors instead of two, distributing load laterally rather than letting it push pavers apart.
- Typical module: rectangular units at a 2:1 length-to-width ratio (common sizes: 4x8 inches, 6x9 inches)
- Cutting complexity: moderate to high, concentrated entirely at the borders
- Waste: 8 to 12%
- Best materials: concrete pavers and clay brick, both manufactured to tight dimensional tolerances that keep the interlock consistent
- Edge advice: a soldier course border eliminates the small triangular cuts herringbone otherwise leaves along the perimeter
Herringbone patterns laid at 45° or 90° provide superior interlock and are the pattern of choice anywhere lateral resistance matters, including patios that double as golf cart paths or occasional parking. The 45° orientation produces a livelier visual line but generates more perimeter cuts than 90°, so budget accordingly if your patio has an irregular footprint.
Pro Tip: Lay herringbone with the long axis of the pattern running toward your main sightline from the house. It visually pulls the eye outward and makes a modest patio feel deeper.
Running bond
Running bond is the paver world's version of a subway tile wall: simple, repeating, and forgiving of imperfect layout math. Rows shift by half a unit, which hides minor sizing inconsistencies far better than a grid pattern would.
- Typical module: rectangular pavers, most commonly 6x9 or 6x12 inches
- Cutting complexity: low
- Waste: 3 to 5%
- Best materials: concrete, brick, or travertine, since the pattern doesn't demand tight dimensional matching between units
- Edge advice: keep border cuts to a consistent width along both long sides so the offset reads intentional rather than accidental
Running bond is pedestrian-grade only. It has no structural role beyond a well-built base and shouldn't be specified where any vehicle load is anticipated.
Basket weave
Basket weave pairs two pavers into a square block, then rotates alternating blocks 90 degrees. The result looks woven, which is where the name comes from, and it has been a staple of colonial and traditional courtyard design for generations.
- Typical module: paired units forming a square, commonly built from 4x8 brick
- Cutting complexity: low to moderate
- Waste: 5 to 8%
- Best materials: clay brick almost exclusively, since the pattern depends on precise 2:1 unit proportions
- Edge advice: a single-row soldier border keeps the woven blocks from appearing to "run off" the edge mid-pattern
Ashlar and modular layouts
Ashlar mixes several paver sizes, often three or four, in a randomized but pre-planned repeat. It's the pattern of choice for large, architecturally serious terraces because it avoids the visual monotony of a single repeating grid while still feeling ordered rather than chaotic.
- Typical module: mixed sizes, frequently a 6x6, 6x9, 6x12, and 9x9 kit sold as a matched set
- Cutting complexity: high, since the randomized layout must still resolve cleanly at every border
- Waste: 8 to 15%
- Best materials: natural stone (travertine, limestone) and premium concrete lines manufactured specifically for ashlar sets
- Edge advice: dry-lay a full pattern run before setting anything in sand. Ashlar's biggest installation failure is discovering a bad repeat only after several courses are already down.
Design guidance consistently pairs modular ashlar and mixed-size layouts with larger terraces, reserving simpler patterns for compact spaces where a busy layout would feel cramped rather than rich.
Circular, fan, and pinwheel accents
These three belong together because none of them should carry an entire patio field. Circular and fan patterns radiate from a center point, usually a fire pit or fountain, and require a manufacturer's pre-cut circle kit or extensive on-site cutting. Pinwheel rotates small units around a central square and works best as a transition border between two larger fields.
- Typical module: kit-dependent for circles; small square units (6x6 or 8x8) for pinwheel
- Cutting complexity: very high for circular/fan, moderate for pinwheel
- Waste: 15 to 20% for circular and fan, 6 to 10% for pinwheel
- Best materials: concrete kits engineered for radial cuts; natural stone if a mason is cutting each piece by hand
- Edge advice: never let a circular inset touch the patio's outer border directly. Frame it with a straight field first so the radial cuts stay contained to a defined zone.
Large-format slabs
Large-format slabs, typically 24x24 inches or larger, minimize joint lines almost entirely and read as a single continuous plane. Large-format porcelain in particular favors grid or ashlar layouts, since manufacturing tolerances allow the tight joints that give the material its clean, contemporary look.
- Typical module: 24x24, 24x48, or custom-cut slabs
- Cutting complexity: low for a straight grid, high if slabs must be cut around curves or fixtures
- Waste: 4 to 7%, though slab breakage on uneven bases can add losses
- Best materials: porcelain, honed natural stone, and precast concrete panels
- Edge advice: because joints are minimal, any border cut must be precise. A hairline error that would disappear in a herringbone joint is glaring in a slab grid.
How to Choose a Pattern by Patio Size and Layout
Patio dimensions dictate which patterns will actually look right, not just which ones you like on a mood board.
- Under 150 square feet: stick with running bond, stack bond, or a simple herringbone. Busy modular or ashlar layouts on a small footprint create visual noise and force awkward border cuts on every side.
- 150 to 400 square feet: this is where basket weave, 45° herringbone, and moderate ashlar mixes start to earn their keep. There's enough room for the pattern's rhythm to register before it hits an edge.
- 400 square feet and larger: full ashlar sets, large-format slab grids, and pinwheel-bordered fields perform best. Bigger canvases can absorb pattern complexity and multiple paver sizes without feeling chopped up.
Orientation matters as much as size. Run the dominant pattern line parallel to your home's longest sightline, usually the view from the primary living space or kitchen window, so the eye reads the patio as an extension of the house rather than a separate slab bolted onto the yard. On narrow side-yard patios, running the pattern lengthwise (rather than across the narrow dimension) makes the space read wider.
Multi-zone patios, dining here, a lounge there, a fire feature somewhere else, benefit from a deliberate pattern shift between zones, but the transition needs a frame. A soldier course, a contrasting color band, or a change in paver size at the seam keeps the shift looking designed instead of accidental. Changing pattern with no border between the two fields is one of the most common amateur missteps on custom projects.
What Complex Patterns Change About Installation
A more intricate pattern doesn't just change how the surface looks. It changes what has to happen underneath it, long before the first paver goes down.
Base depth is the first variable. Permeable interlocking paver systems require an open-graded base and bedding layer, with compaction verified in lifts, and specific surface tolerance limits once the field is set. Pedestrian patios on standard soil typically call for a compacted aggregate base of 4 to 6 inches; patios that might see light vehicle loads, golf carts, service trucks, need that base thickened, and herringbone is the pattern most often specified in that scenario because of its lateral interlock.
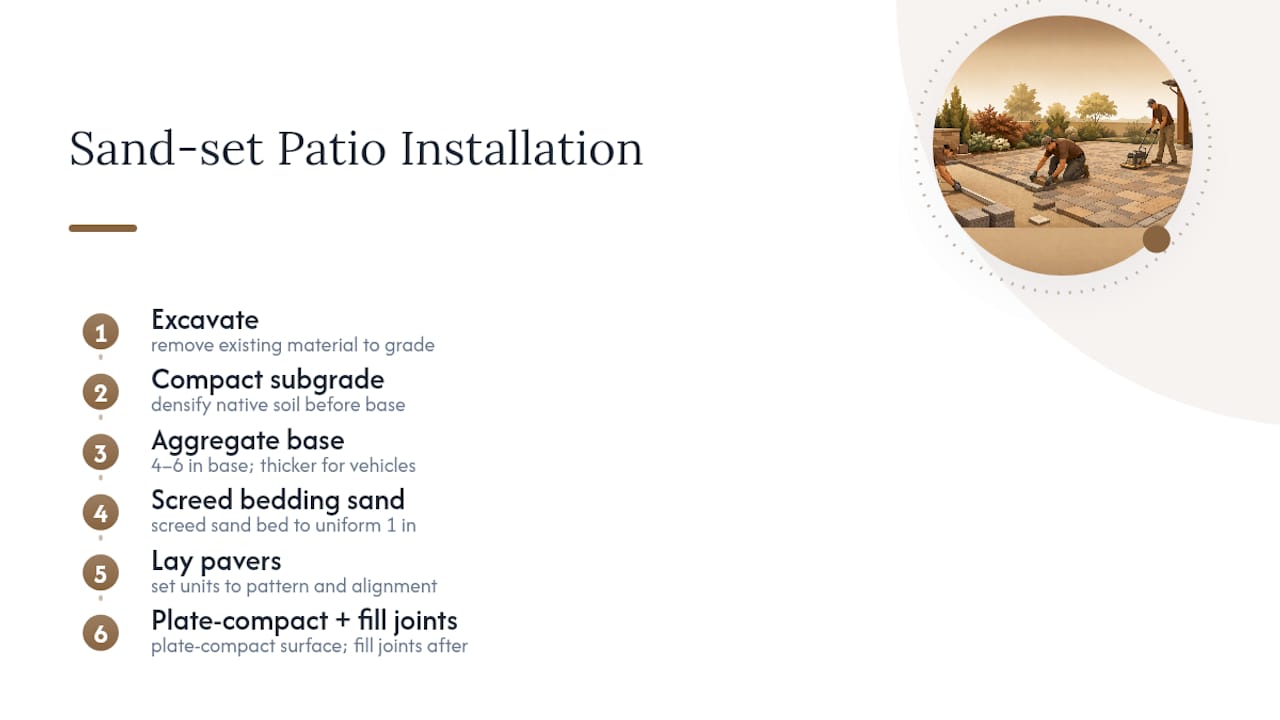
Bedding sand is the second variable, and it's where a lot of amateur installs go wrong. The bedding layer should be screeded to a uniform 1 inch, never used to compensate for an uneven base. Sand-set patio construction follows a consistent sequence: excavate, compact the subgrade, place and compact the aggregate base, screed the sand bed, lay the pavers, then plate-compact the finished surface before filling joints. Skipping the plate-compaction pass after laying, not before, is a common shortcut that leaves pavers loose under the first season of foot traffic.
A note on waste and cuts: circular and ashlar layouts don't just cost more in material. Every curve or randomized seam adds labor hours, since each cut paver has to be measured, scored, and fitted individually rather than snapped along a straight guide line.
Edge restraints anchor the whole system together, and they need to be pinned into the compacted aggregate base itself, not the native soil beside it. Restraints pinned only to soil are one of the more frequent causes of pattern drift over time, since soil shifts seasonally in ways a compacted base doesn't. That drift shows up first in herringbone and basket weave, where the interlock depends on every unit staying exactly where it was set.
Joint width and fill material round out the picture. Narrow joints (under 1/8 inch) with polymeric sand suit slab grids and running bond. Wider joints (up to 3/8 inch) on permeable systems need open-graded joint aggregate rather than traditional sand, since the whole point of a permeable design is letting water pass through rather than sheet off the surface. Homeowners considering a permeable system for drainage-sensitive lots should look at how permeable paver driveways handle aggregate layering and joint fill before finalizing a pattern, since the base requirements differ meaningfully from a standard sand-set patio.
Sites on a grade add another layer of complexity, since drainage planning and base depth both shift once slope enters the equation. Projects built on sloped lots often need additional stabilization strategies specific to hillside patios.
Matching Materials to Your Pattern
Not every paver pattern works with every material, and forcing the wrong combination usually shows up within a year or two.
- Concrete pavers handle almost every pattern on this list, herringbone, running bond, basket weave, ashlar, and are manufactured to the tightest dimensional tolerances, which matters most for interlocking patterns.
- Porcelain is the material of choice for large-format slab grids and stack bond layouts, where its dimensional precision keeps joints hairline thin and its density resists staining better than concrete.
- Natural stone and travertine shine in ashlar and modular layouts, where slight size variation between pieces actually reads as intentional, hand-selected character rather than a manufacturing flaw.
- Brick is basically inseparable from basket weave and traditional herringbone, since the pattern's proportions were designed around brick dimensions in the first place.
Thickness matters more than most homeowners expect. Pedestrian patios generally use pavers 1 3/8 to 2 3/8 inches thick, while any surface expecting vehicle loads needs the thicker end of that range or purpose-rated units. Around pools and on high-sun patios, finish selection affects comfort underfoot as much as looks. Honed travertine and lighter-toned porcelain stay noticeably cooler than dark concrete or dense granite, and textured or honed finishes provide better slip resistance on wet pool decks than polished stone ever will.
Keeping a Patterned Patio Looking Sharp
Maintenance scales with joint width and pattern complexity, not with material alone.
- Sweep debris weekly and rinse quarterly to keep grit from grinding into joint sand.
- Re-sand polymeric joints every 2 to 3 years; sand-filled joints on permeable systems may need attention annually.
- Watch for individual paver settlement, a telltale sign of base compaction failure, and address it before it spreads to neighboring units.
- Reseal every 3 to 5 years depending on traffic and sun exposure.
Sealer choice depends on the look you want. Color-enhancing sealers deepen tone on travertine and natural stone but need reapplication more often. Stabilizing, joint-locking polymeric sealers work best on concrete and brick where the priority is keeping sand joints in place. As a general answer to how often to seal pavers, high-traffic entertaining patios in strong sun typically need resealing closer to the 3-year mark, while shaded, lower-traffic areas can stretch toward 5.
Borders, Insets, and Keeping Multiple Patterns Cohesive
A well-placed border does two jobs at once: it frames the field pattern and it absorbs most of the ugly perimeter cuts that would otherwise land randomly along your patio's edge.
- Use a soldier course, pavers laid perpendicular to the field, to create a clean, cut-free border line around herringbone or basket weave fields.
- Keep medallions and circular insets to one per patio, and always frame them with a straight buffer zone rather than letting them meet the outer border directly.
- Limit a multi-pattern patio to two patterns and one accent color; three or more starts to look like a sample board rather than a designed space.
Pro Tip: If you're mixing patterns across zones, keep the paver material identical between zones and vary only the layout. Changing both pattern and material at the same seam is what makes transitions look unplanned.
A Design-Build Perspective on Pattern and Precision
Pattern selection looks simple on paper until the layout meets an actual site with actual grade changes, drain lines, and a pool edge that isn't perfectly square. A single design-build team catches those conflicts during the 3D rendering phase, before construction starts, rather than discovering a bad ashlar repeat halfway through a pour.
Premium materials, honed travertine, large-format porcelain, hand-selected natural stone, carry longer lead times and tighter installation tolerances than standard concrete units. That reality has to be built into the schedule from the first design conversation, not discovered midway through construction.
Modern Yardz has carried more than 2,900 projects through that exact process, holding California Contractor License #1082881 and a 5.0-star rating built on installations where one team, not a chain of subcontractors, owns the pattern from rendering to final joint sand. Homeowners exploring premium options can review natural stone, travertine, and porcelain paver systems as a starting point for what's possible on a given site.
Why Pattern Choice Deserves the Same Weight as Material Choice
Homeowners spend weeks choosing between travertine and porcelain, then treat pattern as an afterthought decided the week construction starts. That's backwards. A patio's pattern determines how the space reads for the next twenty years, long after the initial material choice fades into the background of daily use.
Think of pattern as the architectural bones of the hardscape and material as the finish. A herringbone field in the wrong material still performs structurally. A beautiful travertine slab laid in a pattern that fights the room's sightlines never quite looks right, no matter how good the stone is. On a property where the patio ties directly into a pool deck, an outdoor kitchen, or a pergola-covered lounge, pattern is what makes those separate elements read as one continuous, designed environment rather than a collection of unrelated purchases. For any project at that scale, working through the pattern decision with a designer before ordering material is worth the extra planning time.
— Thomas Jackson
Let Modern Yardz Design Your Patio Pattern Right the First Time
Choosing among a dozen paver patterns, then getting the base depth, compaction, and edge restraints right, is exactly where most patio projects go wrong when design and construction are handled by separate companies with no accountability between them. Modern Yardz removes that gap entirely. One team carries your project from the first sketch through photo-realistic 3D renderings you approve before a shovel ever breaks ground, then through permitting, material procurement, and construction, with zero subcontractor handoffs every step of the way.
That single-team structure is why pattern decisions actually survive contact with a real site: the crew setting the herringbone field is working from the same plan the designer rendered, not a interpretation passed down through three layers of subcontractors. For a patio, pool deck, or full outdoor living environment built with premium natural stone, travertine, or porcelain, explore Modern Yardz's paver installation services or schedule a design consultation to see your pattern rendered in 3D before you commit to it.
Sources
The installation specifics in this guide draw on Oregon State Extension's paver installation guide for waste factors, the CMHA permeable paver technical guide for base and bedding specs, and CMHA's pattern and interlock resource for herringbone structural performance. Sequencing details come from This Old House's paver patio guide, pattern and material pairing from Techo-Bloc's design guide and Belgard's paver pattern guide, and drainage risk context from Trinity Inspections' foundation moisture guide.
- How to Install Pavers (Oregon State Extension)
- PAV-TEC-010 (Paver interlock and pattern guidance) — CMHA / ICPI resource
- How to build a paver patio — This Old House
- Paver Patio Designs: Patterns for Every Style — Techo-Bloc
Recommended
Start Your Free Design Consultation
Tell us about your project and we'll be in touch within 24 hours. No pressure, no obligation.
Ready to design your dream yard?
Tell us about your project. We'll send back a real plan, not a templated quote.
Book My Free Consultation→